Form Authentication: ASP.NET Security Part 3
Abstract
In the previous articles, you have learned about Windows Authentication and Code Access Security. This article's objective is to further understanding of Form Authentication mechanism in ASP.NET. The developer typically creates a custom authentication mechanism to validate a user name and password against a custom store such as own SQL Server database.
Fortunately, ASP.NET includes a built-in infrastructure for executing such systems. ASP.NET handles and establishes the security context on each request for you. This substructure referred to as Form Authentication.
Form Authentication
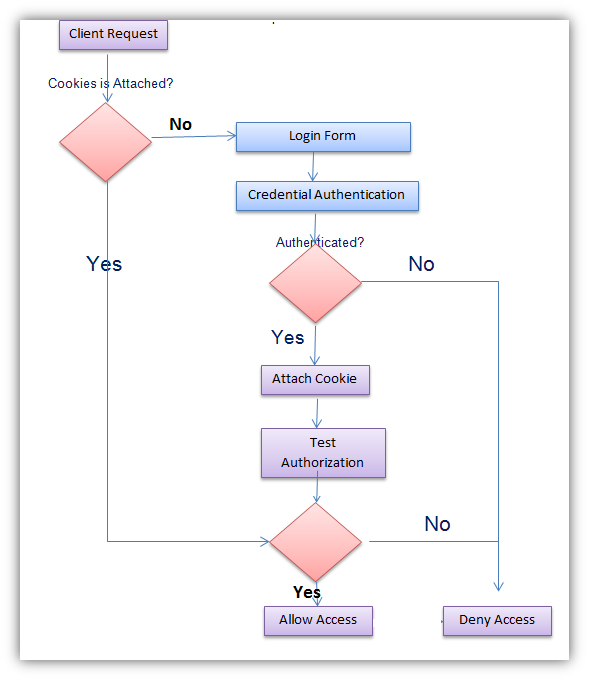
Form Authentication is a token-based system. When users log in, they receive a token with user information that is stored in an encrypted cookie. When a user requests an ASP.NET page via the browser, the ASP.NET verifies whether the form authentication token is available. If it is, then runtime redirects the user to a login page and the validation process of user name and password. If the user is successfully validated, the runtime is automatically configured with the authentication cookie that actually contains the ticket. You can see the whole process in the following image:

Form Authentication proposed couple of fascinating features. First, since form authentication is implemented entirely within ASP.NET infrastructure, so developers have full jurisdiction over authentication mechanism. Second, this feature can be supported by all browsers because it practices standard HTML, so no platform dependency disputes occurs. Finally, the developer himself can determine the storage medium of the crucial credentials.
So far, you have reviewed the reasons that make form authentication an appealing choice for user authentication. However, form authentication also has some downstairs.
- The credentials used during authentication are sent from the browser to the server in plain-text format. So anyone can intercept the communication traffic.
- During the form authentication, the developer has to maintain the security of sensitive details of the users, which it needs in order to log into the system.
- This approach also creates a extra work in form of login page interface.
Implementation
Form Authentication process can be implemented either IIS 7.0 or programmatically. The Role of IIS in the form authentication process will be reviewed later in this article. Here, we examine how to configure the Form authentication mechanism through Visual Studio. In this respect, we have to do some sort of manipulation in the source code and web.config file. The form authentication implementation process occurs in three steps as:
- Creating custom login page interface.
- Web.config file configuration
- IIS configuration.
Supporting Classes
All the form authentication-supporting classes are derived from System.Web.Security namespace given as follows:
1. Creating Login Page
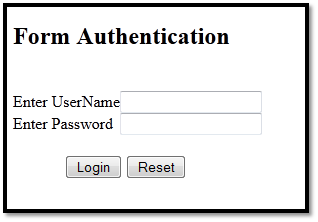
In order to see Form authentication in action, first you have to design the custom login page. That page collects the user name and password from the users and validates it against the credentials stored in the credential depository such as web.config file. Therefore, we have to design the following Login Page interface as follows:

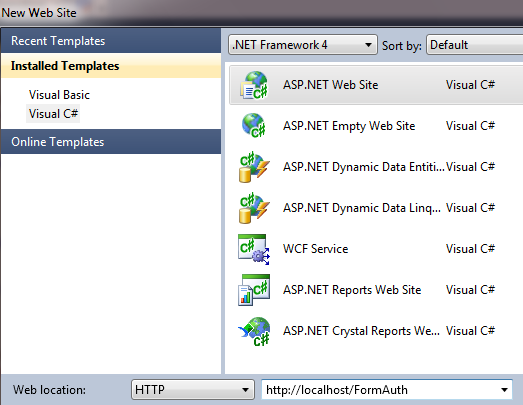
So, open the Visual Studio 2010 and create a New ASP.NET Website name as FormAuth, which stores on HTTP (IIS web server) rather than ad-hoc server as follows:

Now delete all the existing files of this solution from the solution explorer except default.aspx and add a new web form Login.aspx; Place the associated HTML code in the Login.aspx file, which is responsible for rendering the custom login page as following;
[html]
<%@ Page Language="C#" AutoEventWireup="true" CodeFile="Login.aspx.cs" Inherits="Login" %>
<!DOCTYPE html PUBLIC "-//W3C//DTD XHTML 1.0 Transitional//EN" "http://www.w3.org/TR/xhtml1/DTD/xhtml1-transitional.dtd">
<html xmlns="http://www.w3.org/1999/xhtml">
<head runat="server">
<title></title>
</head>
<body>
<form id="form1" runat="server">
<h2> Form Authentication</h2>
<br />
<table cellpadding="0" cellspacing="0">
<tr>
<td>
<asp:Label ID="lblUser" runat="server" Text="Enter UserName"></asp:Label>
</td>
<td>
<asp:TextBox ID="txtUser" runat="server"></asp:TextBox>
</td>
<td>
<asp:RequiredFieldValidator ID="RequiredFieldValidator1" runat="server"
ErrorMessage="*" ControlToValidate="txtUser" ></asp:RequiredFieldValidator>
</td>
<td>
<asp:Label ID="msg" runat="server" Text=""></asp:Label>
</td>
</tr>
<tr>
<td>
<asp:Label ID="lblPassword" runat="server" Text="Enter Password"></asp:Label>
</td>
<td>
<asp:TextBox ID="txtPass" runat="server" TextMode="Password"></asp:TextBox>
<td>
<asp:RequiredFieldValidator ID="RequiredFieldValidator2" runat="server"
ErrorMessage="*" ControlToValidate="txtPass" ></asp:RequiredFieldValidator>
</td>
</tr>
</table><br/>
<asp:Button ID="btnSubmit" runat="server" Text="Login"
onclick="btnSubmit_Click" />
<asp:Button ID="btnReset" runat="server" Text="Reset"
</form>
</body>
</html>
Now, we have to write the code in the defaut.aspx.cs file for validating the credentials against the value entered by the users. Here, you have to add the necessary code for the Click event of the login button as follows:
[php]
using System;
using System.Web.Security;
using System.Web;
using System.Web.UI;
public partial class Login : System.Web.UI.Page
{
protected void Page_Load(object sender, EventArgs e)
}
protected void btnSubmit_Click(object sender, EventArgs e)
{
Page.Validate();
if (FormsAuthentication.Authenticate(txtUser.Text, txtPass.Text))
{
FormsAuthentication.RedirectFromLoginPage(txtUser.Text, false);
}
else
{
msg.Text = "Invalid Username or Password";
}
}
protected void btnReset_Click(object sender, EventArgs e)
{
txtUser.Text = txtPass.Text = msg.Text = " ";
}
}
Here, the Authenticate() method checks the specific user name and password against those stored in the web.config file and returns a Boolean value to indicate whether a match was found. The RedirectFromLoginPage() method does several tasks like, create authentication tickets and cookies with encryption then it added the cookies to the HTTP response, sending it to the client, and finally redirects the users to originally requested page. The second parameter of this method indicates whether persistence cookies should be created.
Once the credentials is successfully validated from the stored user information, the web page is redirected to the Default.aspx page. However, it is mandatory to implement sign-out features to end the current session of a particular user on this page as:
[html]
<%@ Page Language="C#" AutoEventWireup="true" CodeFile="Default.aspx.cs" Inherits="_Default" %>
<!DOCTYPE html PUBLIC "-//W3C//DTD XHTML 1.0 Transitional//EN" "http://www.w3.org/TR/xhtml1/DTD/xhtml1-transitional.dtd">
<html xmlns="http://www.w3.org/1999/xhtml">
<head runat="server">
<title></title>
</head>
<body>
<form id="form1" runat="server">
<h2>Welcome
<asp:Label ID="Label1" runat="server" Text=""></asp:Label></h2>
<asp:Button ID="btnOut" runat="server" Text="Sign-Out" onclick="btnOut_Click" />
</div>
</form>
</body>
</html>
Logging a user out of form authentication is as simple as calling the FormAuthentication.SignOut() method. You can add this code in the SignOut button click event as follows:
[php]
using System;
using System.Web.Security;
using System.Web;
public partial class _Default : System.Web.UI.Page
{
protected void btnOut_Click(object sender, EventArgs e)
{
FormsAuthentication.SignOut();
FormsAuthentication.RedirectToLoginPage();
}
}
2. Configure the Web.Config
The second step for creating a custom login page is to write user credentials information in the configuration file where the user credentials would be validated. Here we hard-coded the user name and password as follows:
[xml]
<?xml version="1.0"?>
<configuration>
<system.web>
<compilation debug="true" targetFramework="4.0"/>
<authentication mode="Forms">
<forms loginUrl="Login.aspx">
<credentials passwordFormat="Clear">
<user name="admin" password="test"/>
</credentials>
</forms>
</authentication>
</system.web>
</configuration>
3. IIS Configuration
Finally, configure IIS to allow anonymous access to virtual directory and configure ASP.NET to restrict anonymous access to the web application
IIS Role
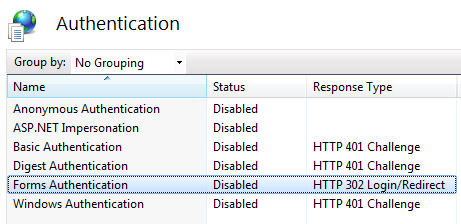
You can configure form authentication by using the authentication configuration feature of the IIS 7.0 management console. Alternatively, IIS management console allow you to configure most ASP.NET capabilities directly. Furthermore, IIS 7.0 leverages web.config file for storing many settings related to web application configuration. Let's take a look at the possibility of configuring form authentication via IIS management console as follows:

After enabling the form authentication, you need to configure the required authentication rules —such as allowing or denying users. Both configuration settings affect your web.config file, and your web server takes this information from the web.config for its behavior as well.
Cookies
So far, you have used non-persistent authentication cookies to maintain the authentication ticket between requests, which implies that if the user closes the browser, the cookies are removed immediately. This sensible step ensures security by mitigating session hijacking attacks.
Despite the risk in persistent cookies, it is appropriate to use them in certain conditions. You simply supply a true value in the second parameter of the RedirectFromLoginPage() method. The following code rewrites the code that authenticates the users when the login button is pressed. It creates persistent cookies with some additional tasks to give cookies a 10 days life span as:
[php]
protected void btnSubmit_Click(object sender, EventArgs e)
{
Page.Validate();
if (FormsAuthentication.Authenticate(txtUser.Text, txtPass.Text))
{
// Create the authentication cookie
HttpCookie AuthCookie;
AuthCookie = FormsAuthentication.GetAuthCookie(txtUser.Text, true);
// Add the cookie to the response
Response.Cookies.Add(AuthCookie);
// Redirect to the originally requested page
Response.Redirect(FormsAuthentication.GetRedirectUrl(txtUser.Text, true));
}
else
{
// Username and password are not correct
msg.Text = "Invalid username or password!";
}
}
Conclusion
In this article, we have reviewed how to use form authentication mechanism of the ASP.NET security modal. We understand the diverse advantages this feature, as well as a couple of downsides. We also learned the programmatic implementation of authentication system with diverse storage repository of the passwords. We have learned about the IIS 7.0 role in the form authentication mechanism to allow and deny users directly from the web.config file. Finally, this article presents a brief idea about cookies importance and implementation.


