DEFENDER: WordPress Plugin Evaluation
Introduction
In this article, we will look at the DEFENDER WordPress plugin. This plugin is touted to provide layered security for WordPress sites/blogs. This plugin is available in the plugins store as "Defender Security, Monitoring, and Hack Protection." This plugin blocks attackers at every level and provides hardening techniques to administrators. Some of the features of this plugin are available as free whereas some features require upgrading to Pro version. In this article, we will look at all the features available in free version.
Test-Environment
-
Installed WordPress locally on a system and using the default theme. The site is named Defender Plugin Test, and it looks like the image below.

- Created Database named "Defender"
- Users created: Infosec (Admin), Test-Infosec(Normal user with no role).
Install
As stated above this plugin is available on plugin store. Follow below steps to install the plugin on the website.

11 courses, 8+ hours of training
- Click on Dashboard > Plugins > Add New
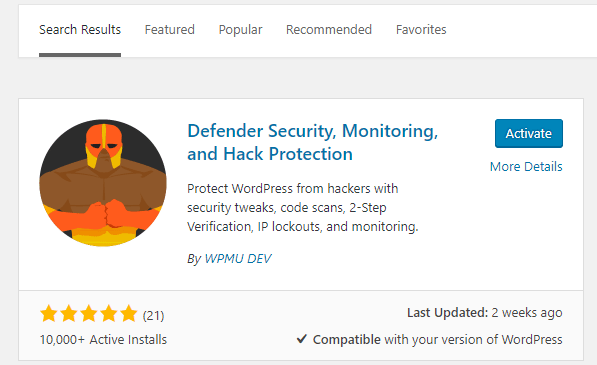
- Type "wpmu defender" in the search box and below entries will be presented.

- Click "Install Now" option or Defender Security, Monitoring and Hack Protection plugin.
-
Click on" More Details" to see the product version and any recent fixes or additions.

- After it is installed, Click the Activate button to activate the plugin.

-
Please note that to install the Pro version directly, copy the wp-defender in the wp-content/plugins folder.

-
After that activate the plugin from WordPress dashboard plugin. In the below screenshot, both free and Pro version of Defender are available. As soon as you Activate one of them, the other one gets deactivated automatically.

- As soon as the plugin is activated, Defender comes into action ask for user nod to perform initial file scanning and IP lockouts. Please note that though this is an optional and highly recommended step. We will also discuss these features in more detail later in this document.
- Click on Get started to start Defender do the initial scanning. Please note that below screenshot shows the plugins gets activated for the free version. In the pro, other features like Audit Logging will be enabled as well.

- Once the plugin is installed, all its features can be viewed in the site dashboard.

- Defender plugin also has its own Dashboard, which will be presented after the initial scanning like below.
- After the initial scanning, we can see that Defender plugin found out 11 security issues in the default site.

Defender Dashboard
Below is a high the combined view of Defender in a dashboard with all the features default setting s and initial findings. We will discuss all these in much detail in the next section.


Features
Let's now look into all the features of this plugin.
Security Tweaks
This feature provides the general hardening guidelines as part of initial scanning. Currently, there are 11 security tweaks which are as below.

It should be noted that security tweaks which are already fulfilled by the website will come under "Resolved" tabs and other will come under "Issues" tab. Following are the list of security tweaks which are embedded into the plugin.
Disable trackbacks and pingbacks

Update WordPress to latest version
This feature checks for whether the underlying WordPress is on the latest version or not to make sure whether the WordPress has any security vulnerabilities or not. Test website has the latest WordPress on it, so this was not flagged.
Update PHP to the latest version
This version checks for PHP latest version. Underlying PHP during testing was latest one, so this was not flagged.
Change default admin user account
This checks for the presence of username 'admin.' It is advised not to use admin username on the WordPress sites. Since I have not used default admin account, this was not flagged.
Change default database prefix
It is recommended to remove the default wp_ prefix from the database and this tweak checks for that. As can be seen below I have changed that to inf_prefix, and changes can be seen in the DB as well.


Disable the file editor
WordPress comes with a default file editor and can be used by attackers to modify core files and themes. This tweak disables the file editor completely so that unauthorized users can not modify important files.

Hide Error Reporting
This feature is useful to prevent the default errors at the front end which gives hints to attackers about the backend.
Update Old Security keys
This tweak will not change the password but only will change the password salt. With this tweak plugin also gives the option to set up a reminder for regeneration of security keys. On Clicking regenerate security keys, existing session is logged out, and user needs to log in again. Please note that password is not changed after this step but only salt.

Prevent Information Disclosure
This tweak provides the resistance to any information disclosure by adding an .htaccess file to the website.

Following is the default restriction imposed by Defender which can be tweaked further by the administrator.

Prevent PHP execution
This tweak prevents direct PHP execution to prevent stealing of data from the website. It does so by placing HTAACCESS file inside the root folder of the underlying website.

After clicking Add .HTACCESS, an .htaccess file will be created or updated with the following content. Admin can also add an exception to this file where they want to permit PHP execution.

Manage Login Duration
This tweak manages the login duration of a particular user. By default, it is 14 days buy the login duration can be configured (in days only).

File Scanning
Scanning
This feature of Defender plugin will scan the core files to look out for irregularities. In the pro version, it can also check for suspicious code as well as irregularities in other plugins and themes as well. Below we can see that the Defender plugin found 4 issues in the core files. These can be ignored since the server is not in a default location and Defender is flagging it. Admin will have the privilege to ignore the issues as well.

Ignored
This section will contain the ignored findings of Defender. For example. If we ignore the first finding from the above, then it will reflect here.

Settings
In settings section, Admin can enable/disable any file scanning plugin and can customize the Email format like a template, subject, etc.


Reporting
In the reporting section, Admin can schedule the file scanning activity completely.

Audit Logging
This feature enables audit logging and provides ease for admin to find out irregularities.
Event Logs
In this, events logs can be generated and exported to CSV. Also, filter for a particular username is also provided.

Settings
This section gives the admin the provision to deactivate the auditing.

Reports
This section gives Admin to schedule the logging reporting.

IP LockOut
This is one of the highlight features of Defender plugin as it gives the Admin the control to stop various attacks such brute force etc. Below are the main features of IP LockOut
Login Protection
Login Protection gives protection against brute force attempts against the site. Admin can configure the following options


404 Detection


IP Banning
This is a very good feature where known lists of bots, blacklisted IPs can be imported directly into the account to avoid attacks such as brute force, etc. It should be noted that currently only IP4 addresses are supported.


Logs
This section will provide the account lockout logs and further details.
Notifications
- Under notifications, admin can enable/disable notifications for Login Protection Lockout and 404 Detection Lockout
- Admin can also configure notification settings like maximum number of lockout emails and their cool off period.

Settings
This section allows configuration for logs retention.

Reporting
Under the reporting Section, Admin can configure the schedule for lockout reports.

Advanced Tools
In the advanced tools, Defender plugin provides additional layer of security with @ factor authentication. Admin will activate this feature.

Below we can see that the roles for which 2 factor Authentication can be enabled. For testing purpose, let's enable the 2FA for Admin role like below.

After that the Admin needs to enable the two-factor authentication in User profile as below.

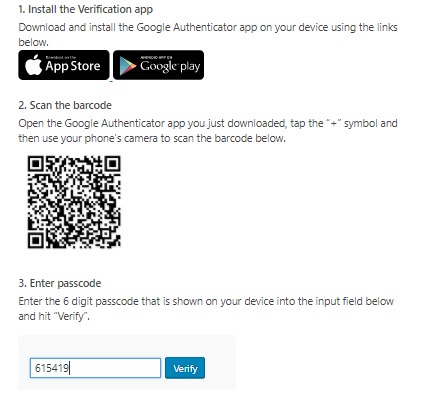
Below are the steps listed to download the install the 2FA app from either Play Store or App Store. User needs to download the app, scan the barcode and verify the code.


11 courses, 8+ hours of training
- After successful verification, below success message will appear. It is very important to update the fallback email address to receive passcode in event of loss of phone.

-
Let's try to login ack to site. After providing username and password, Site now presents with 2FA managed by Defender plugin.


