Applied SSL in Dot NET - Volume 2 –Installation, Testing
The first volume of this series addressed the hypothesis of the secure socket layer (SSL) in the context of .NET based websites. We have obtained a thorough understanding about SSL internals, such as how they work, the role of digital certificates, and the advantages of SSL implementation on asp.net websites. This article resumes the voyage by covering the applied aspect of SSL on .NET website via the IIS web server, along with the creation of digital certificates.
Abstract
Secure socket layer (SSL) is specially designed to protect data transmitted from server to client and vice versa by enabling digital certificates on IIS websites to encode the communication and prevent others from observing sensitive information. SSL employs public key cryptography to establish a secure connection between client browser and server, since anything encrypted with a public key can only be decrypted with the private key and vice versa.
Essentials
The process of SSL certificate configuration on a web server is considered to be very complicated. It typically requires additional software and utilities and a depth of understanding about IIS web server internals.
- VS Studio 2010 with SP1
- IIS Web Server 7.0
- Selfssl.exe
- Browser (IE, Chrome)
SSL (HTTPS) Implementation Life Cycle
Making asp.net secure by implementing secure socket layer (HTTPS) is considered to be a tedious task because diverse technology specialist are involved at two different cycles dur8ing implementation. It is always recommended to attach a digital certificate issued by trustable CA authority rather than a self-signed certificate so users will easily trust your website. This task requires the involvement of a couple of financial and system admin representatives. We will demonstrate SSL implementation via a self-signed certificate over an asp.net website, which typically authenticates valid users while the login and users' logon information is validated by a custom web service. Hence, we will follow these steps:
- Create an SSL certificate (self-signed)
- Install a server certificate on an IIS web server
- Create a web service to authenticate login credentials
- Configure the web service's virtual directory to require SSL
- Test the web service using a browser (optional)
- Install the certificate authority's certificate on the client computer
- Develop an asp.net application to call the web service
- Test the website using Https://
- Add a self-signed certificate to trustable zone.
Getting Started
This section explains the IIS web server, secure ASP.NET applications, digital certificate creation, and configuration in step-by-step format. It is suggested that the aspirant should have all prerequisites to perform the configuration properly.
IIS Web Server Testing
Every website is hosted on a web server in order to populate its resources on Internet. Because this tutorial is about ASP.NET websites, the IIS (Internet information server) must be configured on the developer machine because the SSL setting is done at the web server where the web site is hosted, not at programming site. IIS typically comes as a built-in package in the latest Windows OS family but disabled by default. Generally we can check IIS services is either enabled or disabled by typing the http://127.0.0.1 in URL. If it is not configured, go to Windows features and enable the following check boxes:
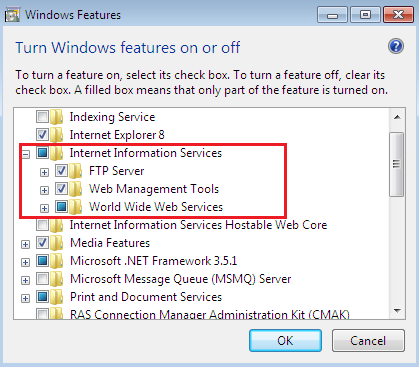
This process generally takes some time to install or activate IIS services on the client machine. We can also enable subsidary services such as FTP from here.
Configuring Website in IIS (Virtual Directory)
Once IIS is installed, open its template by issuing the inetmgr.exe command from Run. During creation of a new website in asp.net, it is bound to default web sites in the IIS. But in this scenario, we will create a new website virtual directory pointing to the %system-drive%inetpubwwwroot directory, where our websites resources will be located. Here, the new configuring website runs as www.sslTesting.com in the web browser.
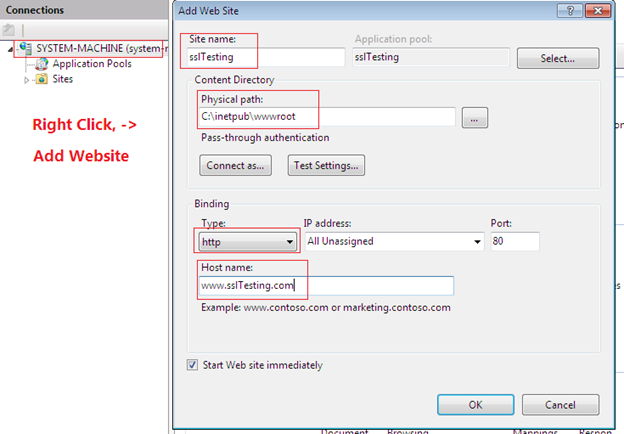
The www.sslTesting.com site is configured but it won't populate on the Internet or locally because the DNS server settings are not yet attached to it. There is no point in running this website on Internet but, in order to run it locally, we shall have to bind it with the local system's IP address through the HOST file (located at %system-root/drivers/etc/):
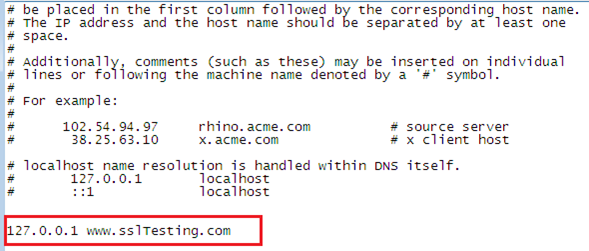
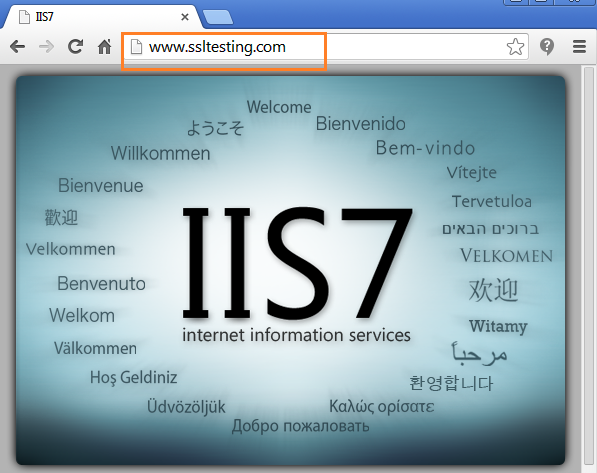
Now we are able to run this website locally, as if we are running a live website on the Internet. But it is running particularly on the HTTP protocol and just populating the server machine default page.
Web Service Development for User Authentication
The front end of this website displays a login page and a login authentication web service is employed at the back end in order to validate the user name and password. The user-sensitive information is typically stored in a database but, in this exercise, we will store them in a XML file.
[xml]
[WebMethod]
public DataSet Validate()
{
tmpDs.ReadXml(Server.MapPath("~/Auth.xml"));
return tmpDs;
}
This XML file contains an entry for username and password for a single user as shown below:
[xml]
<?xml version="1.0" encoding="utf-8" standalone="yes"?>
<logDetails>
<user1>
<username>ajay</username>
<password>test</password>
</user1>
</logDetails>
Creating Self-Signed Digital Certificate
There are two options for creating a digital certificate. First, buy a digital certificate from a trustable CA, but this is not free and it will cost something to acquire a certificate that ensures the valid identity of our website. Second, if we want to run a website on an intranet, then a self-signed digital certificate is perfect option. The process of configuring both certificates on the web server is the same.
So select the system machine name from the left- panel in IIS manager and click over Server Certificates:
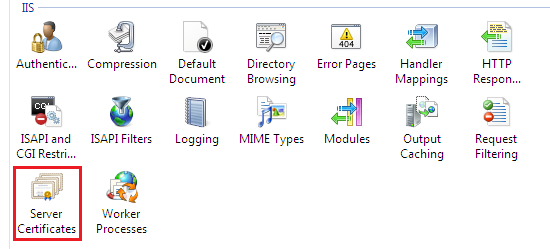
Now, choose the Create Self-Signed Certificate option from the very right pane in the IIS manager:

Specify any name for the self-signed certificate; for example, www.sslTesting.com:
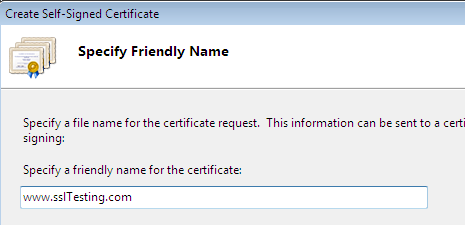
The self-signed certificate is created and located in the server certificates list with other information, such as "Issued To," "By," and "Date":

Binding Certificate to website
It is not necessary that only a single website is hosted by the IIS web server. The list can include more than one website, and we have to bind the created self-signed certificate to our website www.sslTesting.com:

Up until now, the website www.sslTesting.com was running on the HTTP protocol under port 80. In binding, we will allow our website to run on port 443 with HTTPS protocol, as well as attaching the digital certificate:
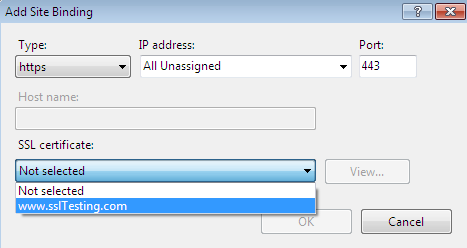
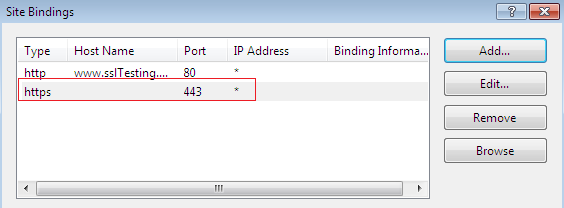
After that, we can see that the www.sslTesting.com website is also configured to allow secure traffic on port 443 with HTTPS protocol:
Asp.Net Web Application (with HTTPS)
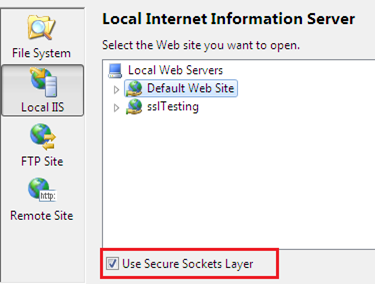
First of all, open Visual Studio 2010 with Administrative Privilege and then choose FileàNewàWebsite to create a new asp.net website. Now choose HTTP as the website location and select Default Web Site from local IISI make sure to check the Use Secure Sockets Layer I, as shown below:
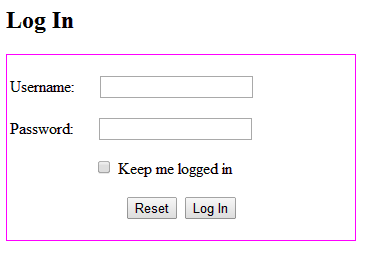
Now design a typical login form prototype by placing two text boxes and two buttons in the default.aspx file. The design will be in this form:
It is not necessary that every user is a computer geek and must have the difference HTTP and HTTPS protocols. Some user directly type the name of the website without even using the "https://" prefix. In the following code, check either that the entered URL is accompanied with "https" or not. If not, then it automatically prefixes the https://
[xml]
if (!Request.IsSecureConnection)
{
Response.Redirect("https://" + Request.Url.Host + Request.RawUrl);
}
In this exercise, we are validating users with the correct user name and password information, which resides into a XML file despite the fact it is typically located in a database. The following code extracts the login information from the XML file and validating the user credentials:
[xml]
string uid = obj.Validate().Tables[0].Rows[0]["username"].ToString();
string pwd = obj.Validate().Tables[0].Rows[0]["password"].ToString();
if (UserName.Text == uid && Password.Text == pwd)
{
..
}
else
{
..
}
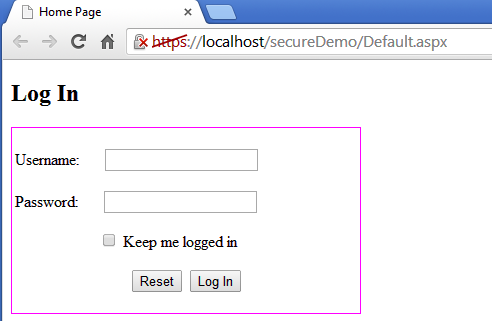
The coding for the login form implementation is completed. Now, compile the website; the web page will be run by the "https://" protocol this time because we enabled the SSL option earlier. But, the URL produces an error about an unrecognized digital certificate. So no one will be willing to open our website until that cross mark disappears.
Testing on Custom Website (Host Name)
We have configured a local website by making an entry in the system host files, so that it gives us the impression it is a real HTTPS website. But, as usual, it results in a digital certificate error. However, all browsers provide an option to move ahead even if the digital certification expiry alert is flashing.
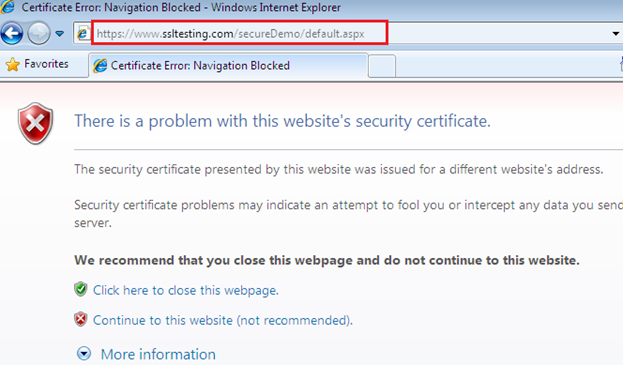
We can even go forward and run the login page but the IE address bar repeatedly shows "Certificate Error":

This is not an issue, especially with the IE browser. If we visit this website with another prominent browser, such as Google Chrome, the result will be the same as earlier:
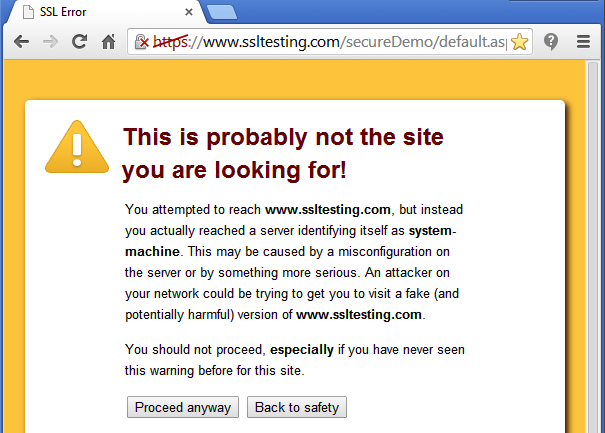
Such a digital certificate-related error always gives a bad impression and users will avoid our website because we don't ensure that their sensitive data is safe at our website; they won't surf it and, in this case, only a valid digital certificate can ensure our website's identity.
Adding Self-Signed Certificate to Trustable CA
So our website is ready to use, every configuration is placed properly, but we have failed to handle the digital certificated related alert message. It is obvious that we can have such an error when we use a self-signed certificate in our local website. But we can eradicate this error by adding a manual entry of our self-signed certificate in a system-trustable CA. Open IIS and note the ID of our current www.sslTesting.com website, which is, of course, 4.

Open the command prompt with Admin rights and run selfssl.exe with the following parameters. Here, the /v switch determines the validity of certificate in terms of days and the /S switch points to the ID of our current website.
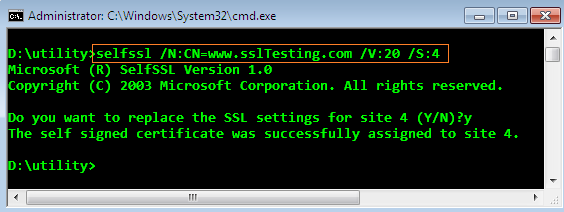
After that, open MMC and add Certificates templates from the Add or Remove snap-ins.
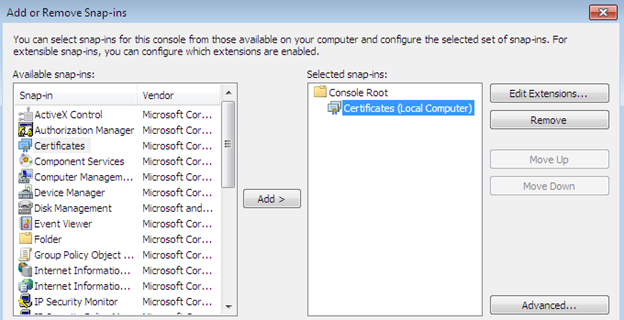
Allow the "Certificates" snap-in to manage local computers. Once it is installed, we can have multiple folders related to certificates management in the root. The Personal folder specifies the repository of locally created self-signed certificates, as we can see in the following. Hence, this is the hack; until we move it into Trusted Root Certificate, our browser always shows an alert related to SSL certificate.
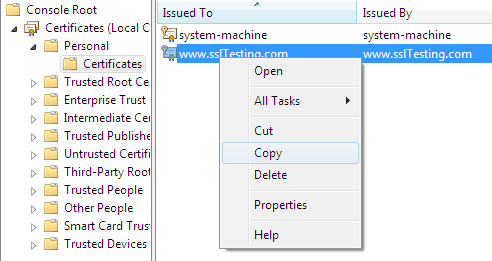
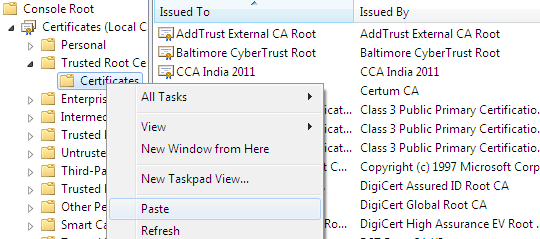
Copy the recently created self-signed certificate "www.ssltesting.com" and paste it into the Trusted Root Certificate sub-folder Certificate:
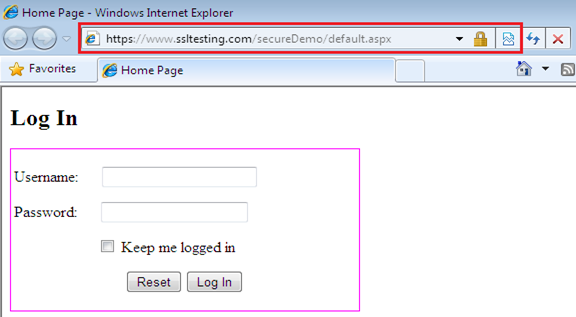
Now, run the IE browser and locate our website with HTTPS. This time browser does not show any error because the self-signed certificates is added to the IE trust zone.
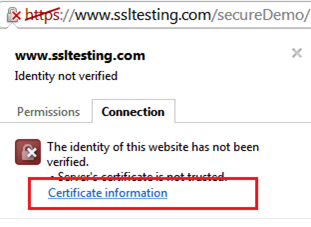
IE won't give any SSL alert because it is a Microsoft product itself, but this does not guarantee that other browsers won't produce an alert. The Google Chrome browser still show the cross mark on "https," as shown in the following figure.
We can fix this problem in the Chrome browser by clicking the Certificate Information from the cross mark on "https":
In the details tab, we can get all the information related to this self-signed certificate for "www.sslTesting.com," such as validity, issuers etc. But the Chrome browser is still unable to recognize them because they are not yet exported to the Chrome trusted zone.
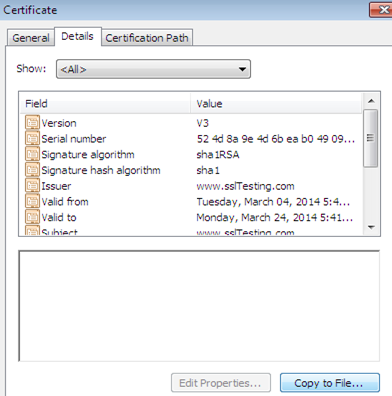
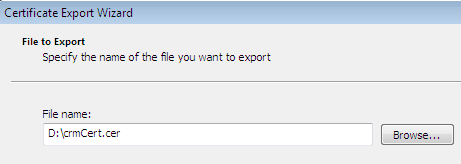
Click on the Copy to File Tab and export these details to an ad-hoc file as crmCert.cer, which is stored somewhere in the memory.
Now go to the Chrome browser's advanced settings and Manage Certificates in the HTTPS/ SSL; switch to Trusted Root Certification Authorities, which lists all the valid digital certificates.
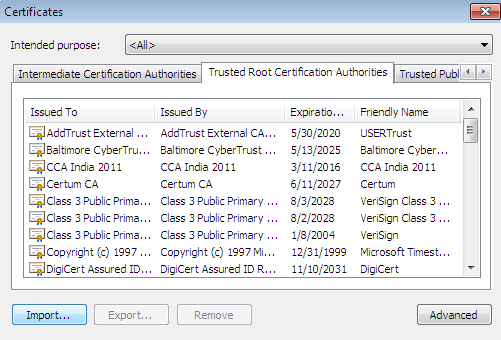
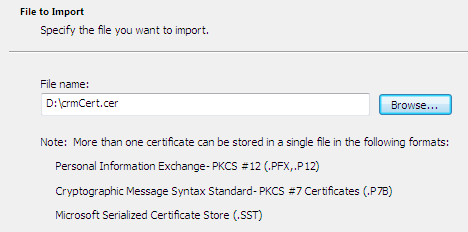
Now import the crmCert.cer file here; the moment it is added, the Chrome browser trusted zone also has the self-signed certificated information.
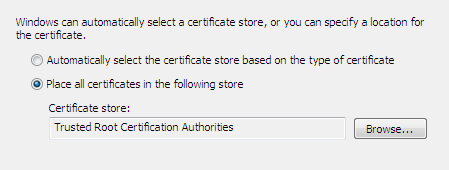
It is important to place the details from the ad-hoc file into the Trusted Root Certification Authorities, as shown below:
Finally, test the URL with the https:// option in the Chrome browser; it runs perfectly this time:
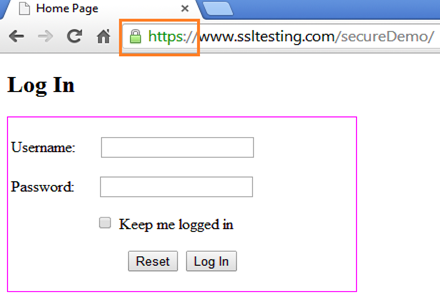
After showing the digital certificates in the browser via HTTPS, we can ensure the user that his login information, such as user name and password, is completely safe and intact while transmitting across the network.
Final Note

11 courses, 8+ hours of training
This paper showcased the complete life cycle behind SSL implementation in the form of digital certificate over a typical asp.net website. We have seen how we can drive our website to be populated by the HTTPS protocol so that all the communication happens in encrypted form back and forth. The idea behind configuring a self-signed digital certificate to our website is that the user can manipulate his sensitive data through our website fearlessly.


